Fill Your Own Capsules

Save Money. Live Healthier.
Herbal Nootropic Brain Enhancing Formula

Herbal Nootropic Brain Enhancing Formula


Boost your brain power, wake up your senses, and give your brain the high quality, herbal nutrition that it needs to function at maximum capacity. You’ll be able to make over a year’s supply with this recipe, saving big money from your usual name brand supplements. Filling your own capsules is easy to do and certainly worth your time.


Herbal Nootropic Brain Enhancing Formula Materials


Tools


  • Capsule Filling Machine (optional)
  • Mixing bowl


Instructions


Blend the three herbal powders together. Stir slowly with a spoon or spatula to reduce dust.

If you notice any powders clumping, pass the powder through a sifter or strainer.

Fill your size 00 capsules to capacity. This can be done by hand or with a capsule filling machine.

Finished 00 capsule approximate mg:

Lion’s Mane Extract – 225 mg

Gingko Biloba Extract – 200 mg,

Bacopa Monnieri – 200 mg,

How to Use the Plexiglass 100-Hole Capsule Filling Machine

How to Use the Plexiglass 100-Hole Capsule Filling Machine


For lack of a better name, I am calling this capsule filler the Plexiglass Filler because of the material it is made of.   This filling machine is available on Amazon, eBay, and I also saw it on AliExpress.  It’s constructed of Plexiglass sheets and manufactured in China.  It’s available under a few different brand names, the one I purchased was a Dailyloop.  I’ve also seen it branded as Keenso, Nukraft, and Yuuu.  It can be found in 100-hole and 187-hole and for capsule sizes 2, 1, 0, 00, and ooo.

The instructions that are included are fairly clear, with small photographs to guide you.  I actually needed a magnifying glass to see them clearly.  If you follow their instructions to the letter, you may run into some problems.  That’s why I’m breaking it down, step by step, and showing you how to improve your technique for this specific machine.   If you follow my recommendations, the capsule-filling process will go faster and with much less mess.


Familiarize Yourself With the Parts


To help reduce any confusion,  my very first recommendation is to label or number the parts as you set up the machine.  Here’s an image from the manufacturer to assist you.


Now although they provide a photo of the parts, it is still confusing because at first glance, the parts look pretty similar.  I’m going to help you identify them and set up.


Part #1 Body Plate:

This is the layer that is made with 2 pieces that are attached to each other with springs.  This is your base where the filling action happens.  It holds the capsule body, which is the larger, bottom piece of the capsule.


Part #2 Cap Plate:

This piece looks like some others.  Identify it by the metal bolts in each corner.  It will hold the caps of your capsules (the top, smaller piece).


Part #3 Director Plate:

This piece is distinguishable by the shallow sides that surround it.  This is used as an insertion guide for the capsules and with my tip later, you’ll see how it can be used to reduce the mess.

Part #4 Middle Plate:

This piece, which looks like some of the others, can be identified by the grooves that have been shaved from 2 edges. Make sure the grooves are facing up.


Part #5  The Tamper

The instructions call it the temper.  This is the piece with 100 little pegs.  It is used to pack the powder down into the capsule, so you can fit more.  Mine came packaged with the handle unattached.  The screws are already in place, so you just have to remove and reinsert them to screw the handle down with a Phillips screwdriver.


Part #6 The Spreader

This the white plastic tool that you use to smear the powder around with.  You will use this to load the capsules with the powder.


Again, I am going to recommend that you label these pieces before you start.  You can use a Sharpee Marker, an erasable marker, sticker labels, or as some recommend, carving the numbers permanently, so that they don’t wash off.  Either way, after you’ve identified and organized all your parts, you’re ready to move to the next step.


Set Up Your Workspace


In working with this particular machine, I’ve concluded that it is one of the messiest capsule fillers I’ve ever used.  That’s not to say it can’t be somewhat contained, following my tips should help with that.

Get a large, plastic or silicone place mat or tray to work on.  You could even spread out a small newspaper.


Gather the following parts:


Part #1 Body Plate
Part #2 Cap Plate
Part #3 Director Plate

Align and place Part #3 on top of Part #1.


Preparing Your Empty Capsules


This part can go one of two ways….

Situation A:   In an ideal world, you would have known to purchase separated capsules.  The tops and the bottoms of the capsules come packaged separately and are ideal for use in the Plexiglass Filling Machine.  If you have these, congratulations, you get to skip down to the part that says Loading Your Pre-Separated Capsules.

Situation  B:  Just like most of us, you have the capsules that come assembled.  These are the most common types of capsules available and chances are, that’s what you’re using today.  If that’s the case, you get to do an extra step.  You will have to separate your capsules before you go any further.  But don’t separate them just yet!

Let me just explain a little about the process of loading capsules before we begin.  Ideally, you would just dump a bunch of capsule bottoms onto the Director Plate, shake it around a bit, and the capsules would fall into the holes, you than discard the excess.  My first time using this machine, I separated 100 capsules and then poured them over the holes and shook it.  It took FOREVER to get the bottoms to fall into the holes.  This is because it is meant to be used with a giant scoop of capsule bottoms, it seems that the over-abundance of pieces helps them fall in.  Without this abundance, the process doesn’t work properly and is a huge time waster.  You would probably have to separate 300 capsules to get this affect and that seems like an even bigger time waster to me.


The Quickest Way to Load Pre-Assembled Capsules


This might sound counter-productive, but I recommend that you separate and then load each capsule one at a time.   Yes, I know this sounds like more work.  It did to me too, but I timed it and this way is definitely more efficient.  The process is actually very easy.

Place the Part #1/Part #3 combo near your left hand and place the Part #2 near your right hand.  When you first pick up the capsule, feel for the ridge and align the capsule in your fingers so that the large part is on the left side and the smaller, top, is on the right side.  With a horizontal action,  pull the capsule apart.  With your left hand, place the larger piece of capsule in the first hole of the Director Plate.  With your right hand, place the smaller piece of capsule in the first hole of the #2 Cap Plate.  My estimate is that it would take between 1 and 2 seconds to do each capsule.  On average, it should take you about 2 minutes.


Loading Your Pre-Separated Capsules

If you are loading bulk separated capsules, you’ve got it a little easier.  Dump a cup or two of capsule bottoms onto the Director Plate.  Cover the side opening with your hand and shake the machine back and forth to allow the capsules to fall into the holes.  When it looks like you’re done, uncover the side opening and pour the excess pieces back into your container.

Now you have to visually inspect the holes to make sure they are all filled with capsule bottoms that there aren’t any double-stacked.  This part is a little tricky because if you’re using clear capsules, they are hard to see.

Next, align the #3 Director Plate over the #2 Cap Plate and gently push and join them together.  Repeat what you just did with the bases, but do it with the tops.  Pour a generous amount of tops onto the Director Plate, cover the side opening with your hand and agitate them from side to side until they fall into their holes.  Dump out the excess and visually inspect for any missing or double pieces.  Set this aside when you’re done. 


Filling Your Capsules


After some trial and error, I decided to modify the manufacturer’s instructions.  They tell you to pour the powder over the capsules in the Body Plate and spread it around.  Do this and you will regret it.  Without any sides to contain the powder, you are unable to get any volume with which to push it down.  It pours over the sides and creates the most unevenly packed capsules I’ve ever seen.


Instead, modify the process by having the Director Plate on top of the Body Plate.  Now you will have the ability to push the powder down more evenly and efficiently.  The included powder spreader will NOT work during this part, it is too big.  Use a stiff card or do what I did, fold the instructions in thirds, and use that.


After you’ve spread and pushed the powder down into the holes, clean the excess off of the surface


Next, remove the #3 Director Plate.  Press the remaining powder into the holes, clean off the excess, and use the tamper.  When new space is freed up in the capsule, you can add a more powder to maximize your capsule’s capacity.  You can see a demonstration in this video:


Now it’s Time to Cap Them

I have a love-hate relationship with this process.  I love the ability to place 100 caps at a time, what a great invention!  On the other hand, it just never seems to go smoothly.  Maybe I’ll get better after a few more rounds with this machine and maybe you’ll have better luck than me.  However, I have found that every time I use this machine, some tops don’t click on the bases, some capsules get crushed, some bottoms get smushed if I push too hard, and some capsules get stuck in the holes and they’re difficult to remove.

To begin the capping process, pick up Part #4, the Middle Plate, make sure the grooves are facing upwards, and place it carefully on top of Part #2 the Cap Plate.  Part #4’s job is to hold the caps in place because you are about to carefully pick up those two pieces, keeping them together, and gently flip them upside down.  Align and place them on top of the capsules you just filled.  Press it down, gently at first, to get a feel for it.  You are in the process of putting the caps on now, so if you push too hard, you run the risk of crunching the bottoms of the capsule bases.  If you are too rough, you risk cracking the edges of any misaligned caps.  If you press too lightly, the caps might not click-lock onto their bases.   Here’s the process:


Results will vary, but here’s mine:


I needed tweezers to get a couple of damaged and stuck capsules out of the holes, but overall, it did the job.  I’ve seen videos where people have gotten better results than me, so keep your hopes up.  If you can master this Plexiglass capsule filling machine, you could really same a ton of money making supplements.

Copycat Capsule Recipe – Doctor’s Best Magnesium 100mg  – Cheap DIY

Copycat Capsule Recipe – Doctor’s Best Magnesium 100mg – Cheap DIY

Learn How to Save Big Money on Doctor’s Best High Absorption Magnesium Glycinate Lysinate 100 mg.


Doctor’s Best Magnesium supplement is the best selling magnesium supplement on the market today.  Customers boast about how effective it is. You can check out the reviews on Amazon and see for yourself.  The reviewers there are highly informed and provide an abundance of useful information about this supplement.  Conversely, many reviewers complain about the gigantic size of the Doctor’s Best Magnesium tablets.  I even saw the word ginormous used a few times.  Luckily, you’re going to learn how to solve this problem today.

Magnesium glycinate is commonly taken to help with osteoporosis and cardiovascular disease.  It’s a wonderful form of magnesium, but since it is best taken daily, the price can add up to $100 a year.  If that’s the only supplement you’re taking, that’s not so bad.  But if you’re like most people, you could be buying a dozen different supplements and these costs can really add up.

By filling your own capsules with magnesium glycinate lysinate, you can save a whole bunch of money and actually get a better quality product than Doctor’s Best.  Filling your own capsules is not complicated and you can learn everything you need to know about it here on this blog.


BETTER Formula and Cheaper!


I’ll show you how to get the same dosage of magnesium glycinate without all the fillers and for a fraction of the cost and a fraction of the size!


The main ingredient in Doctor’s Best Magnesium is magnesium glycinate, but there’s a lot of other stuff in there too.  I’m not saying that it’s bad stuff, but these are pills, not capsules.  Pill manufacturing requires these extra starches, fillers, and coatings in order to produce the product.  You can, however, skip all that extra stuff and just take pure magnesium glycinate in capsules that you fill yourself.

Another benefit worth mentioning is that without the fillers, these will be much easier to swallow!  The Doctor’s Best pills are large.


Let’s see what ingredients we will need…


Oh, this is going to be easy. To make our new and improved formula, we’re only going to need one ingredient, the magnesium.  I easily found it on Amazon here.

This is the same type of magnesium used in the Doctor’s Best formula.  This bag holds 500 mg, which is about a pound, and will be enough to make 1250 capsules. You’ll probably never need to make that many, so you’re going to have about 2/3 of the bag left.  See if any of your friends would like to share the bag with you.


Let’s Do Some Some Calculating

I had some choices with choosing a capsule size.  If I was to create a capsule with only 100 mg in it, similar to the Doctor’s Best pills, it would so tiny, (size 4 or 5) I wouldn’t be able to use a manual capsule filling machine.  Filling them by hand is NOT an option for me, I don’t have that kind of time or patience.

I made an executive decision and chose to do an entire daily dose in one simple capsule.  A size 1 capsule will do the job perfectly by holding approximately 400 mg.


Materials You Will Need


Total cost to make year’s worth of capsules: $26


I didn’t include the cost of a capsule filling machine because you might already have one.   You can pick one up for around $20 and use it for all the new supplements you’re going to make!


Not Too Much Time or Effort Needed

Many of the new generation capsule fillers that you can find on Amazon let you fill 100 capsules at a time.  When you’ve gotten comfortable with the machine, you will be able to do a batch 5 minutes.  In about a half an hour you could have all the capsule filling said and done.  A year’s supply!

The more manual filler types, like The Capsule Machine or the Cap M Quik, would take you about 45 minutes, but that’s if you wanted to do all 365 caps in one sitting.


Don’t Be Afraid

First time capsule filling can be messy and daunting, but don’t let that deter you.   You will get comfortable with it in no time.  Watch a YouTube video for guidance, there’s lots of them there.  Good luck & Enjoy!

Choosing the Right Capsule for Your Filling Needs

Choosing the Right Capsule for Your Filling Needs

Right Capsule for Your Filling Needs Start Here

Empty capsules now come in so many different sizes, colors, materials, and even flavors, that it can become confusing or even overwhelming to choose one.   I’m only going to cover information on capsules that are available to the everyday person, not those who are wholesaling with pharmaceutical companies.  To make things simple, let’s start with the basics.


Common Materials that Capsules are Made From

Gelatin

This is the most popular material available for empty capsules. Gelatin capsules are made from beef gelatin (like Jell-O, but thin & crunchy).    They are readily available in all sizes and they are the most affordable option.

Vegetarian capsules

There are two types of vegetarian capsules.  The less common and harder to locate is a capsule derived from tapioca starch.  Those who are, or have to be, hyper-health conscious, may find these to be an ideal choice although they are not available with as many size options as the others.  You can often find them called pullulan capsules.

In more common use, is your standard vegetarian capsule.  They do not contain any animal products or by-products, but they don’t contain any vegetables either.  Don’t let the name fool you, even if it says vegetable cellulose. This is not necessarily a bad thing, just a little misleading to some.  Most vegetarian capsules are made from the cellulose pulp of trees (usually pine).  A material that has more in common with paper than vegetables.

They do cost a little more than gelatin capsules, but if you’re trying to avoid animal products, this is the most convenient choice.


Choose the size capsule you will need

Capsules come in a variety of sizes, the largest being the 000 (triple zero).  Lots of people are able to swallow a capsule this size and it is widely used in popular supplements, but fair warning, it is referred to as a horse pill by many.

The most popular size capsule and most commonly used in supplements is the size 00 (double zero).   Five of these capsules will equal a teaspoon of powder.  Learn more about teaspoon dosing here: How Many Capsules Make a Teaspoon?

The next size down is the 0 (zero).  This size is easy to swallow because of its smaller size, but can still hold up to 800  mg. (chart below).

Even smaller than the size 0, is the size 1.  Now this is where capsule sizing numbers get confusing.  As the numbers go up, the sizes goes down because the size 2 is even smaller than then 1.   When you start getting into the smaller sizes of 1 through 4, you’re usually getting these capsules for pets or children.

When choosing a capsule based on it’s milligram capacity, keep in mind that different ingredients have different densities.  A capsule filled with a light, fluffy powder will weigh less than a capsule filled with dense clay.

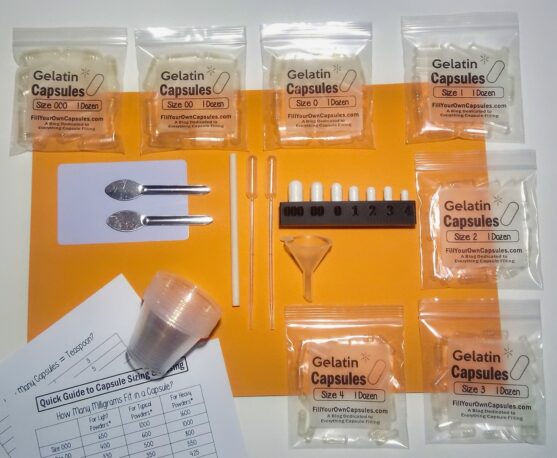
If you’d like to see all the sizes before you commit to buying a big bag, you can get a seven-size variety pack to try them out. The package features a dozen or more of each popular size, 4, 3, 2, 1, 0, 00, and 000.  Plus it comes with a simple to understand chart to help you calculate milligrams based on the different densities of powders. Check it out HERE on Amazon.


Do you need them to come pre-separated?

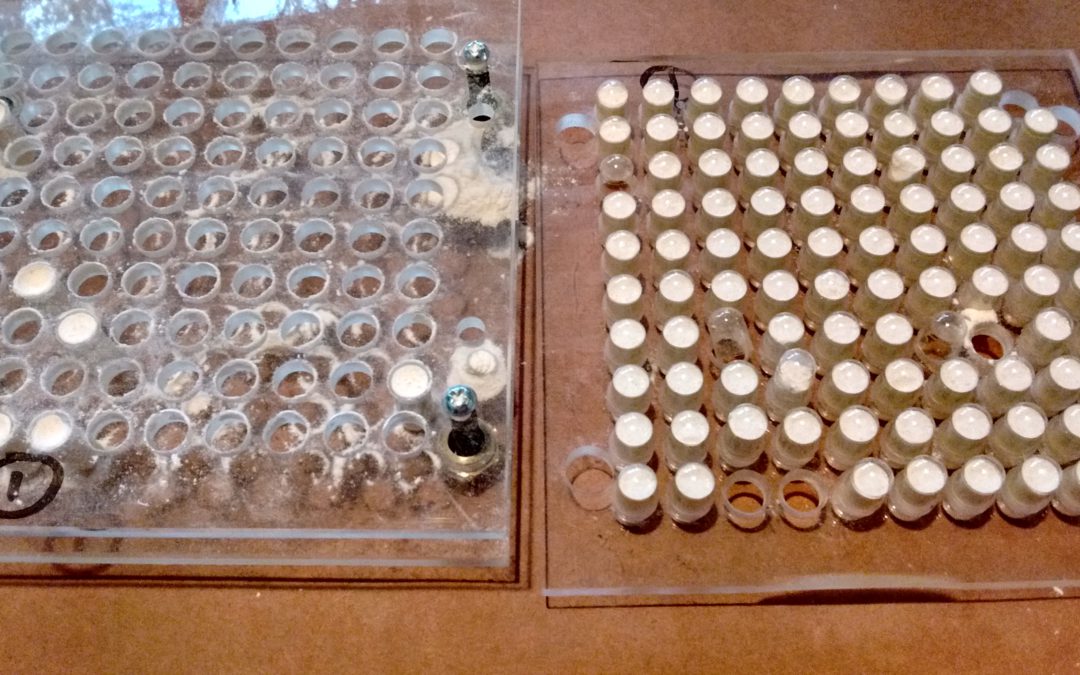
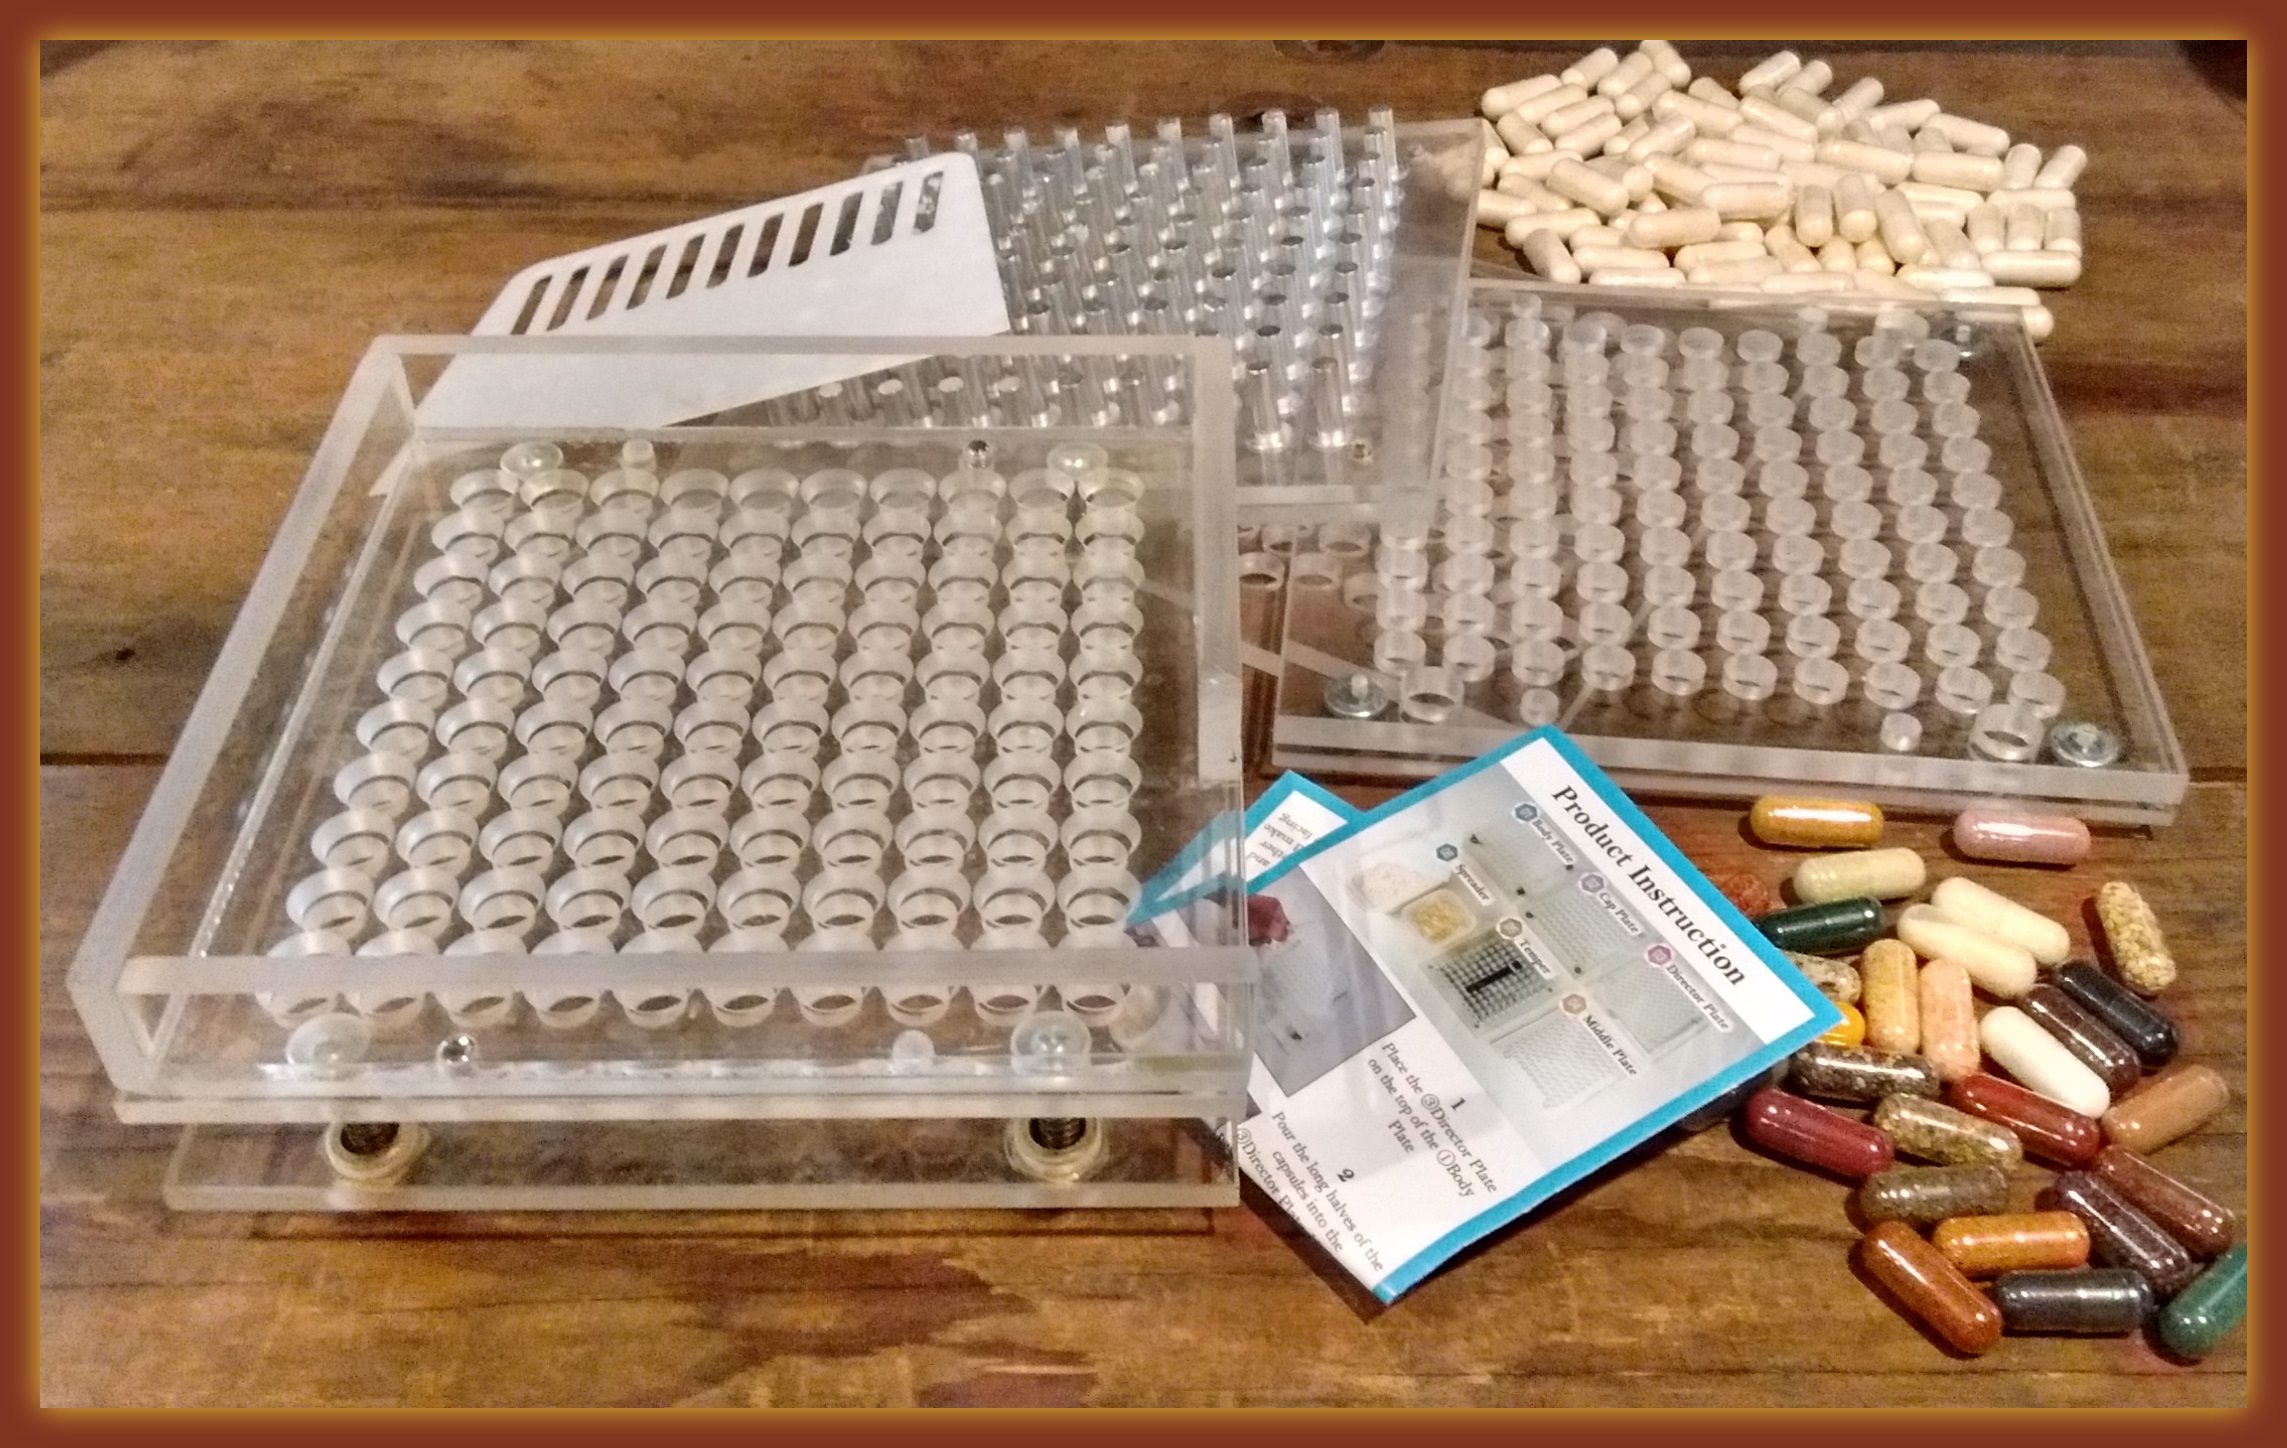
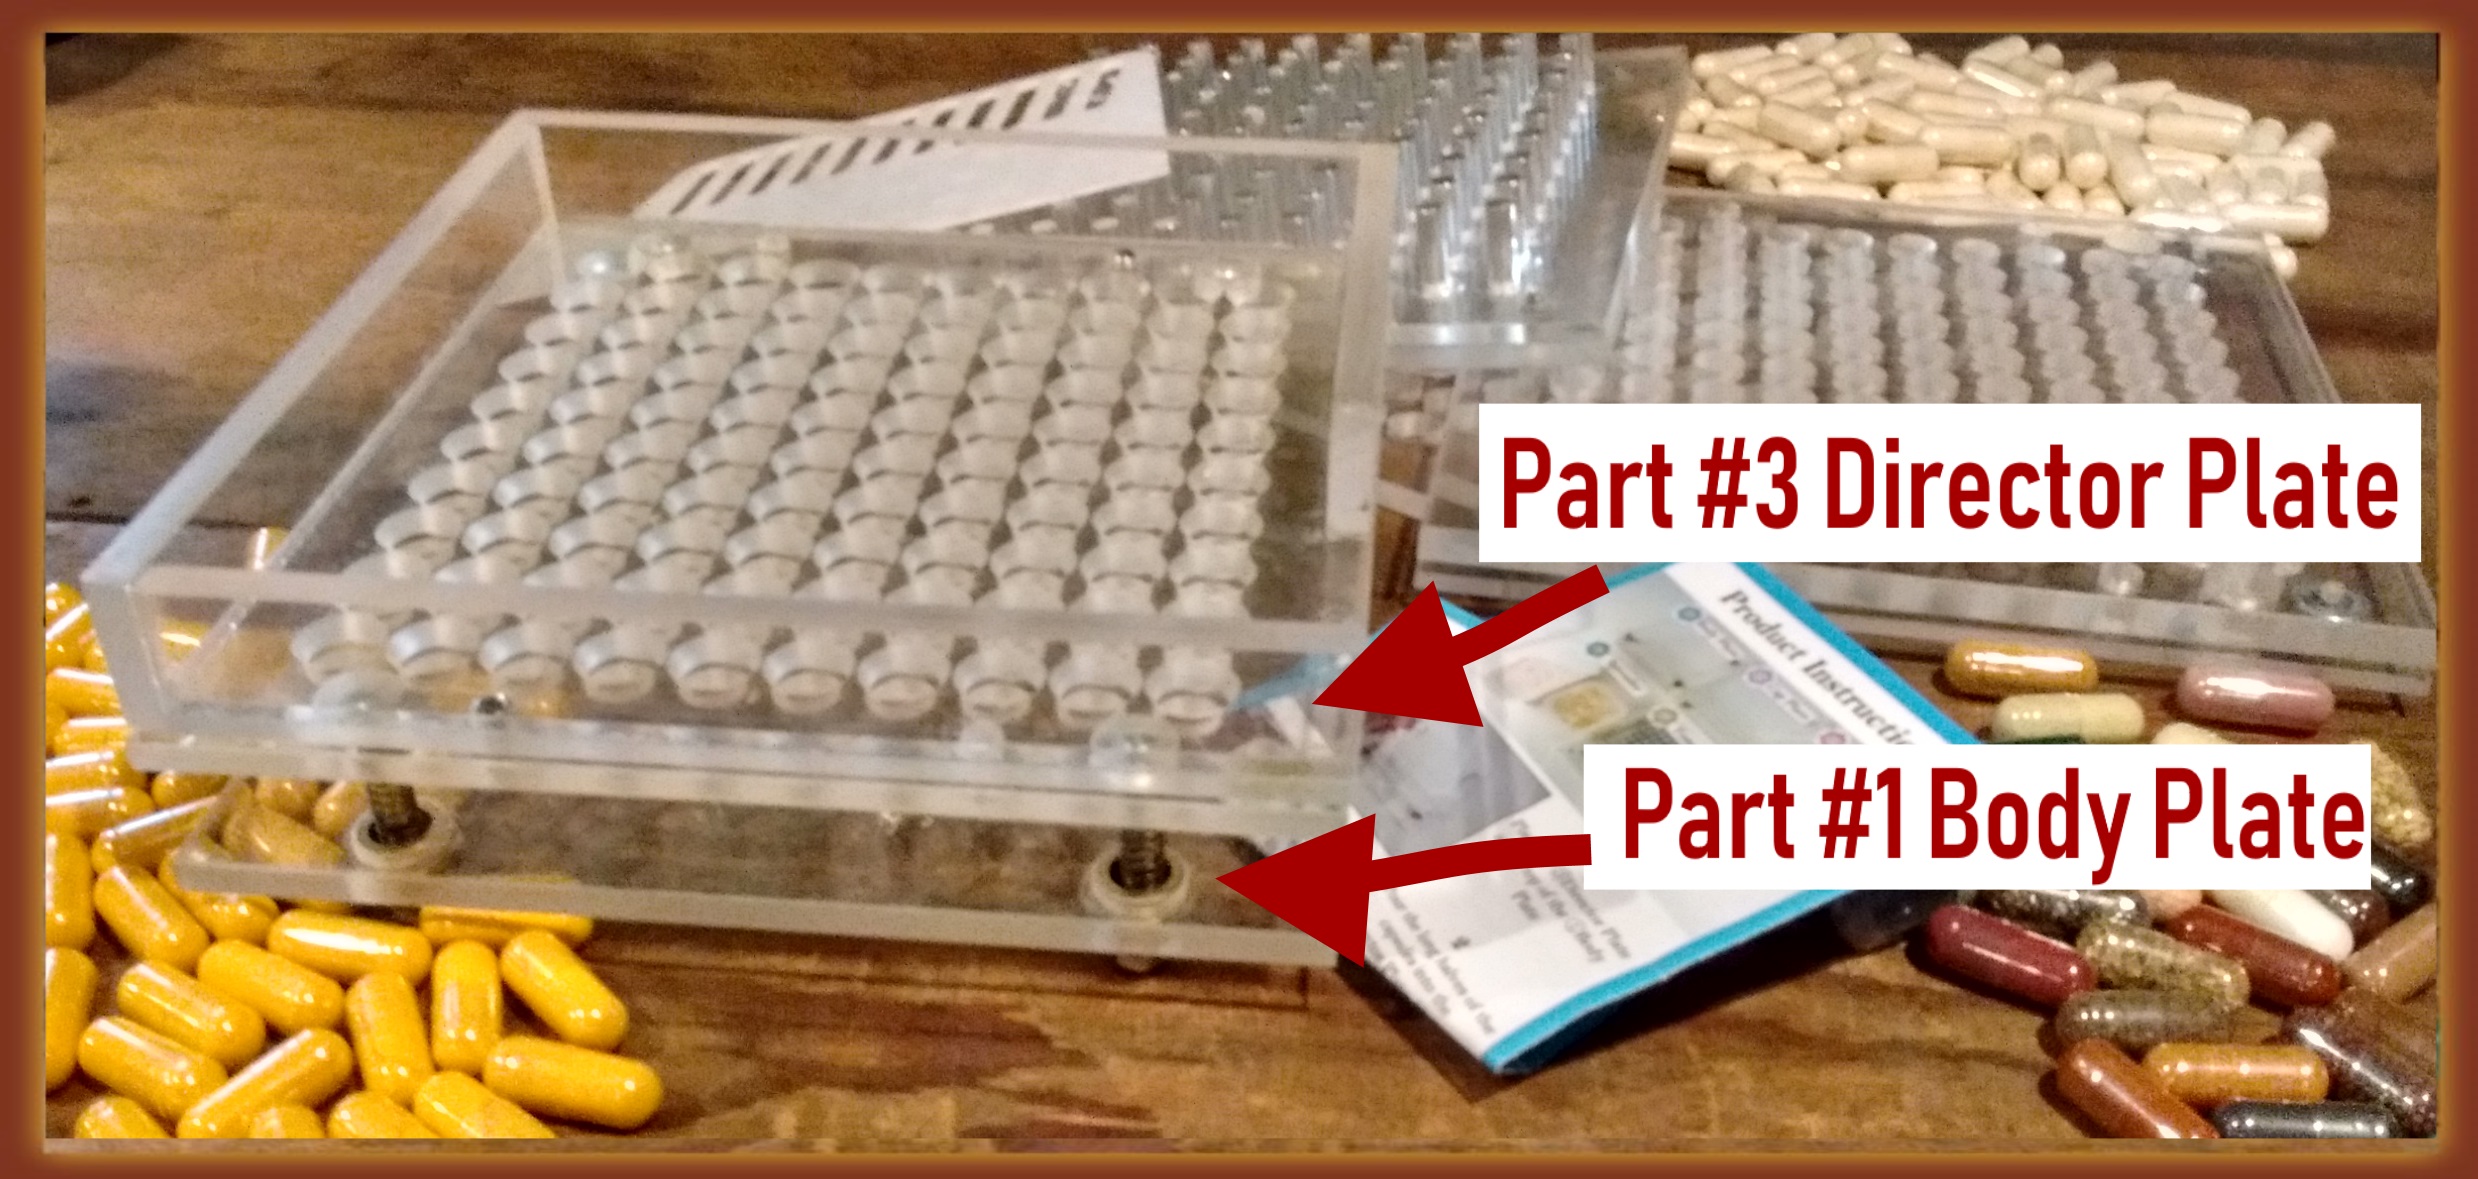
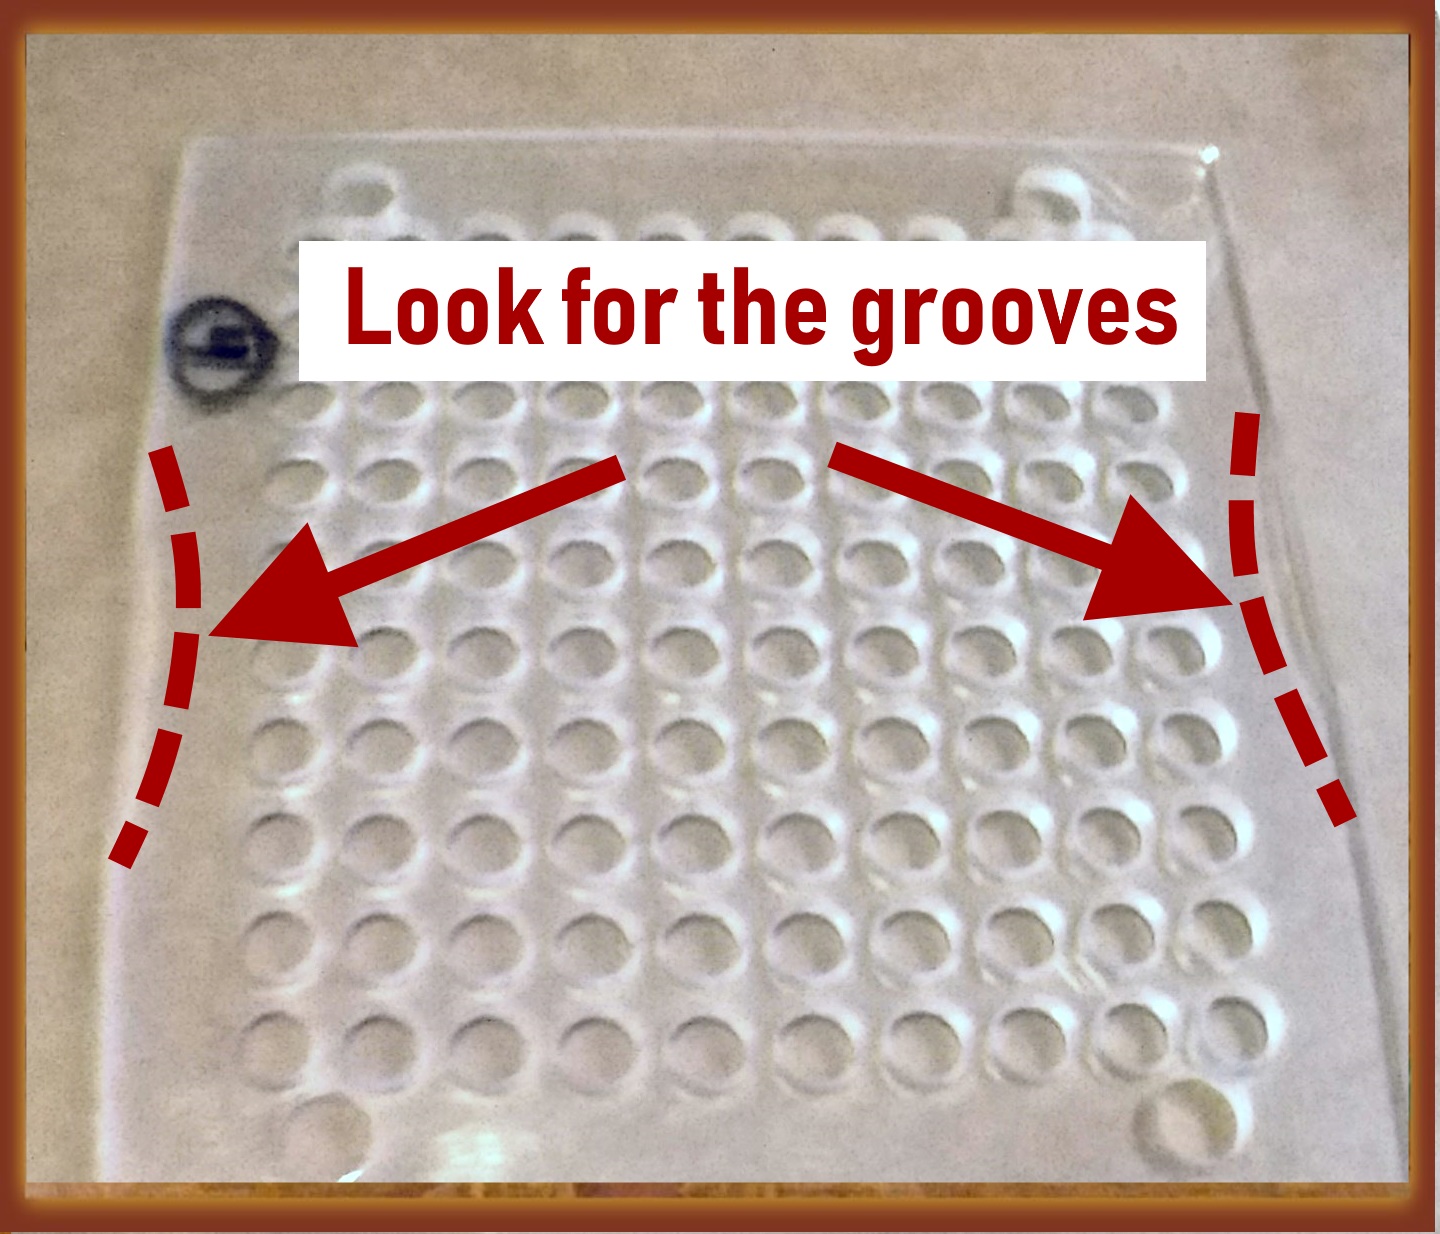
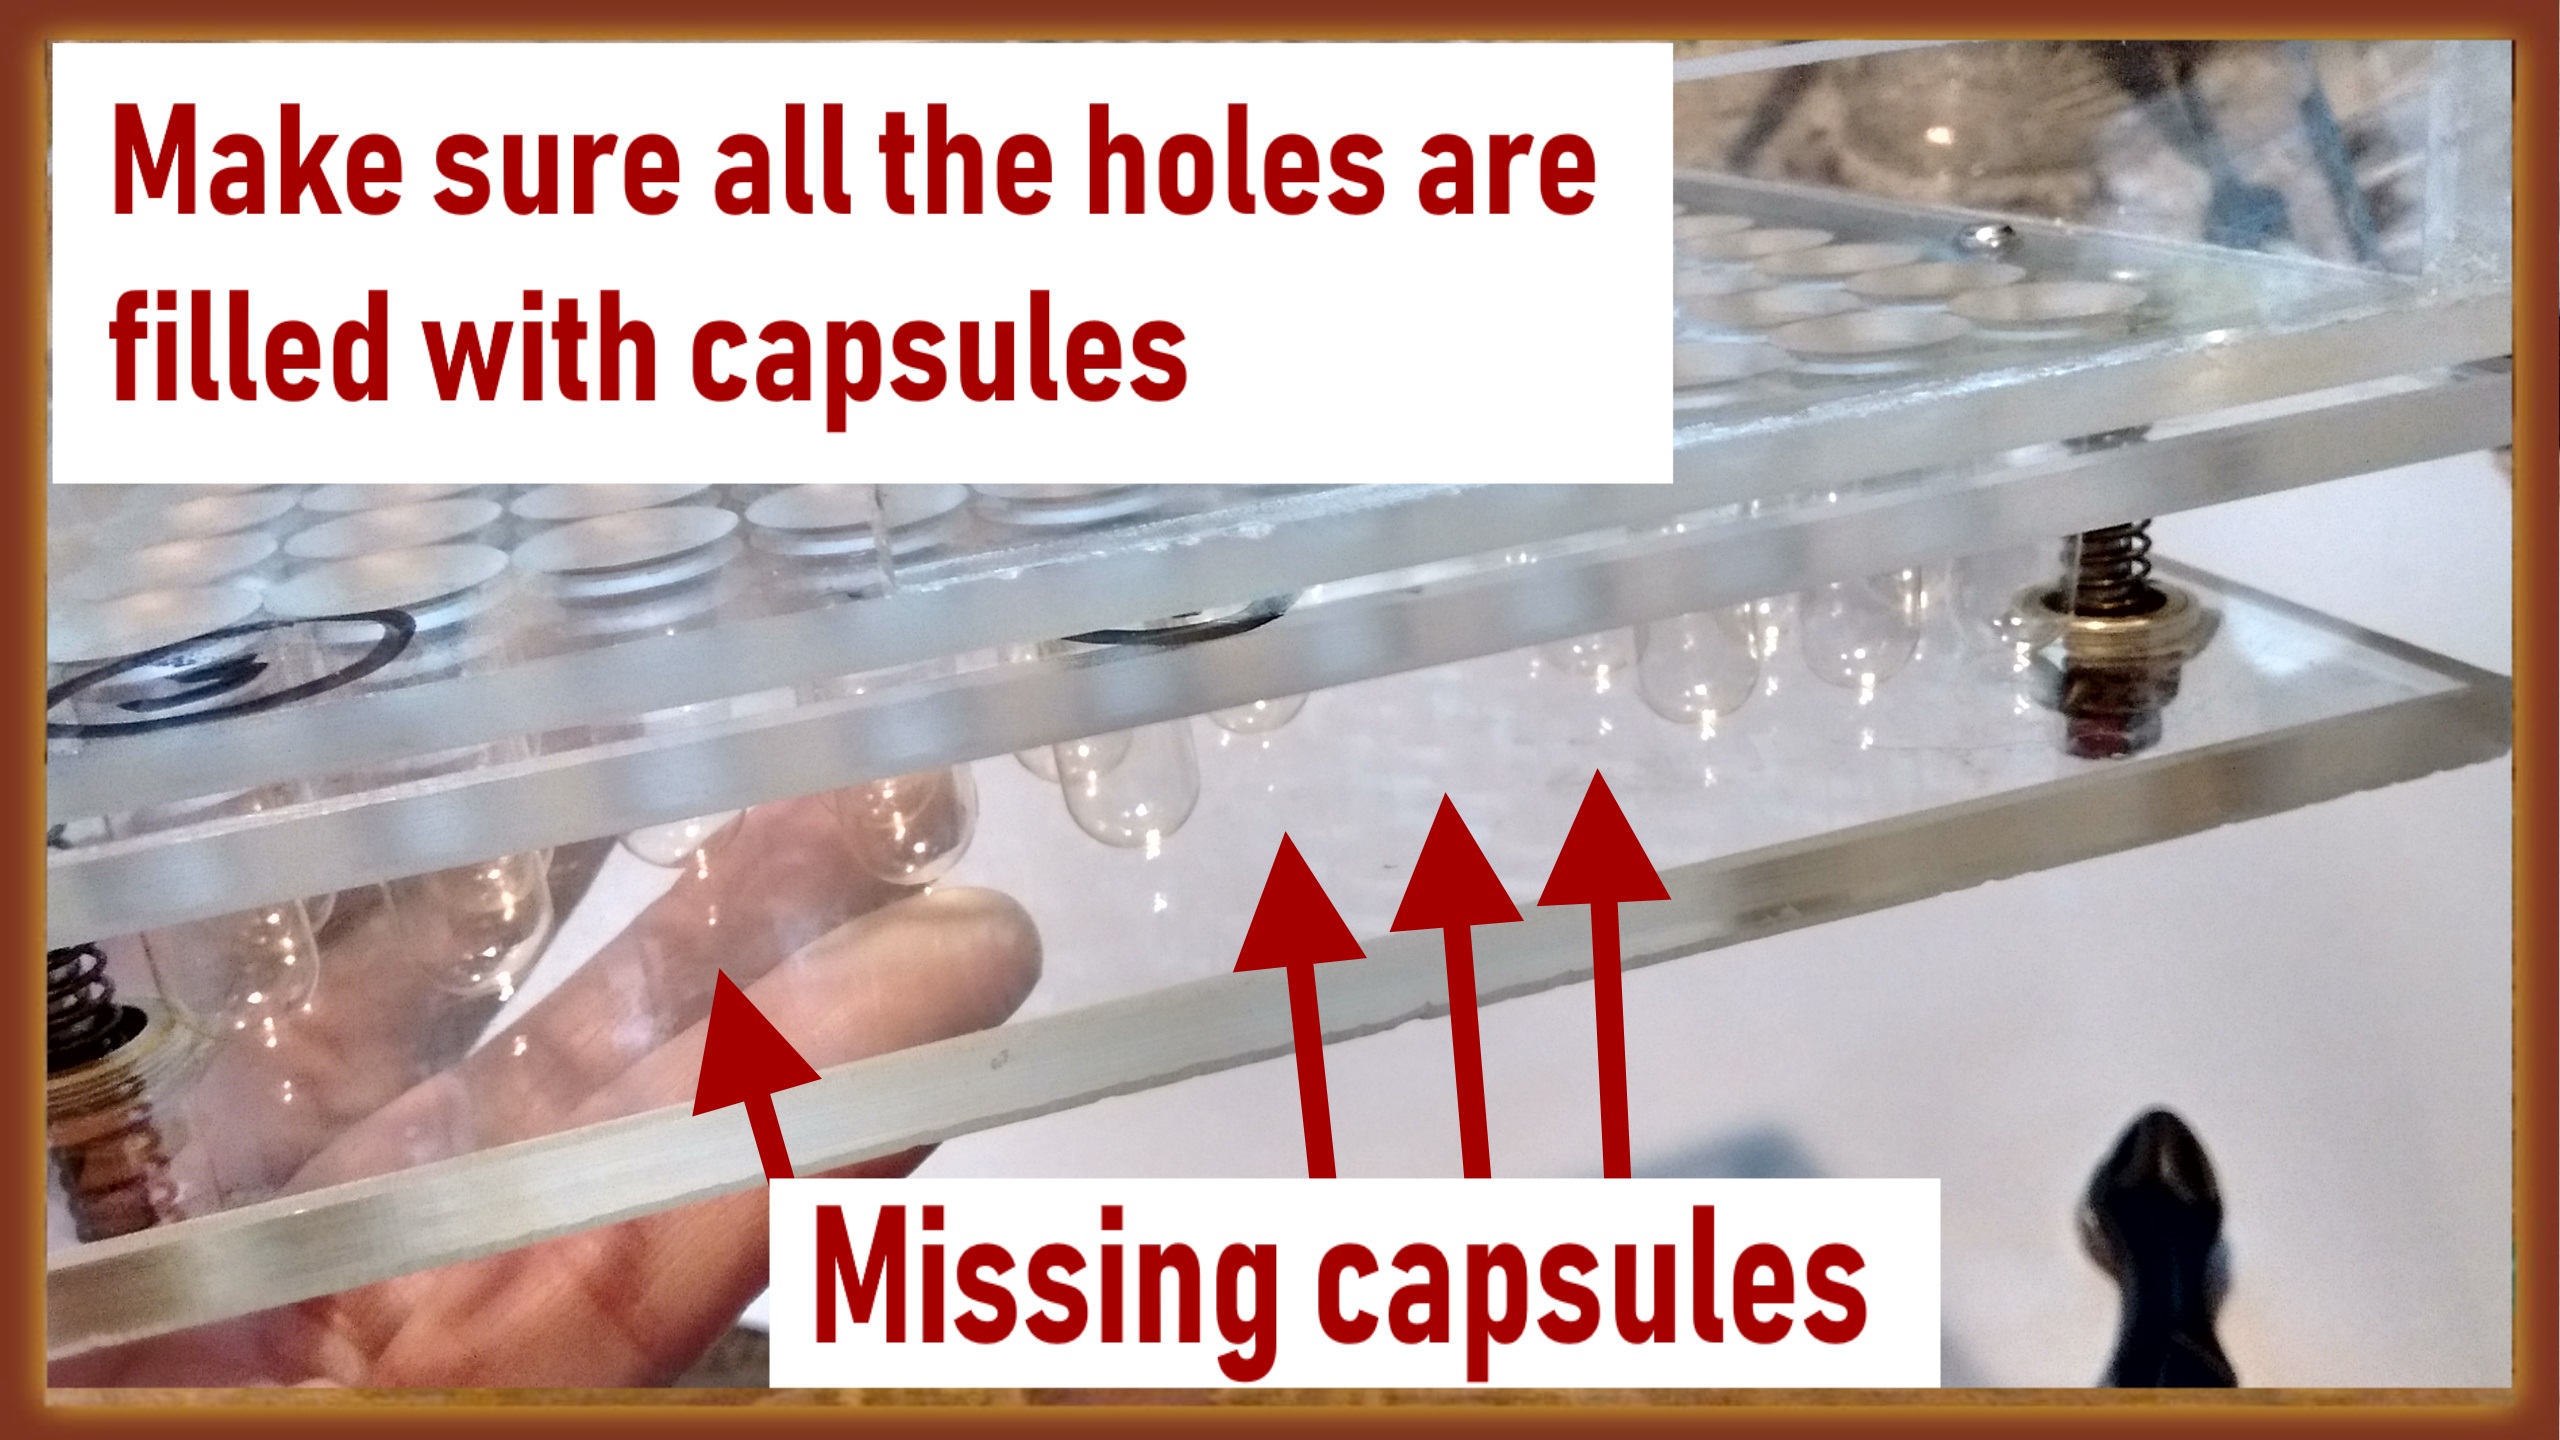
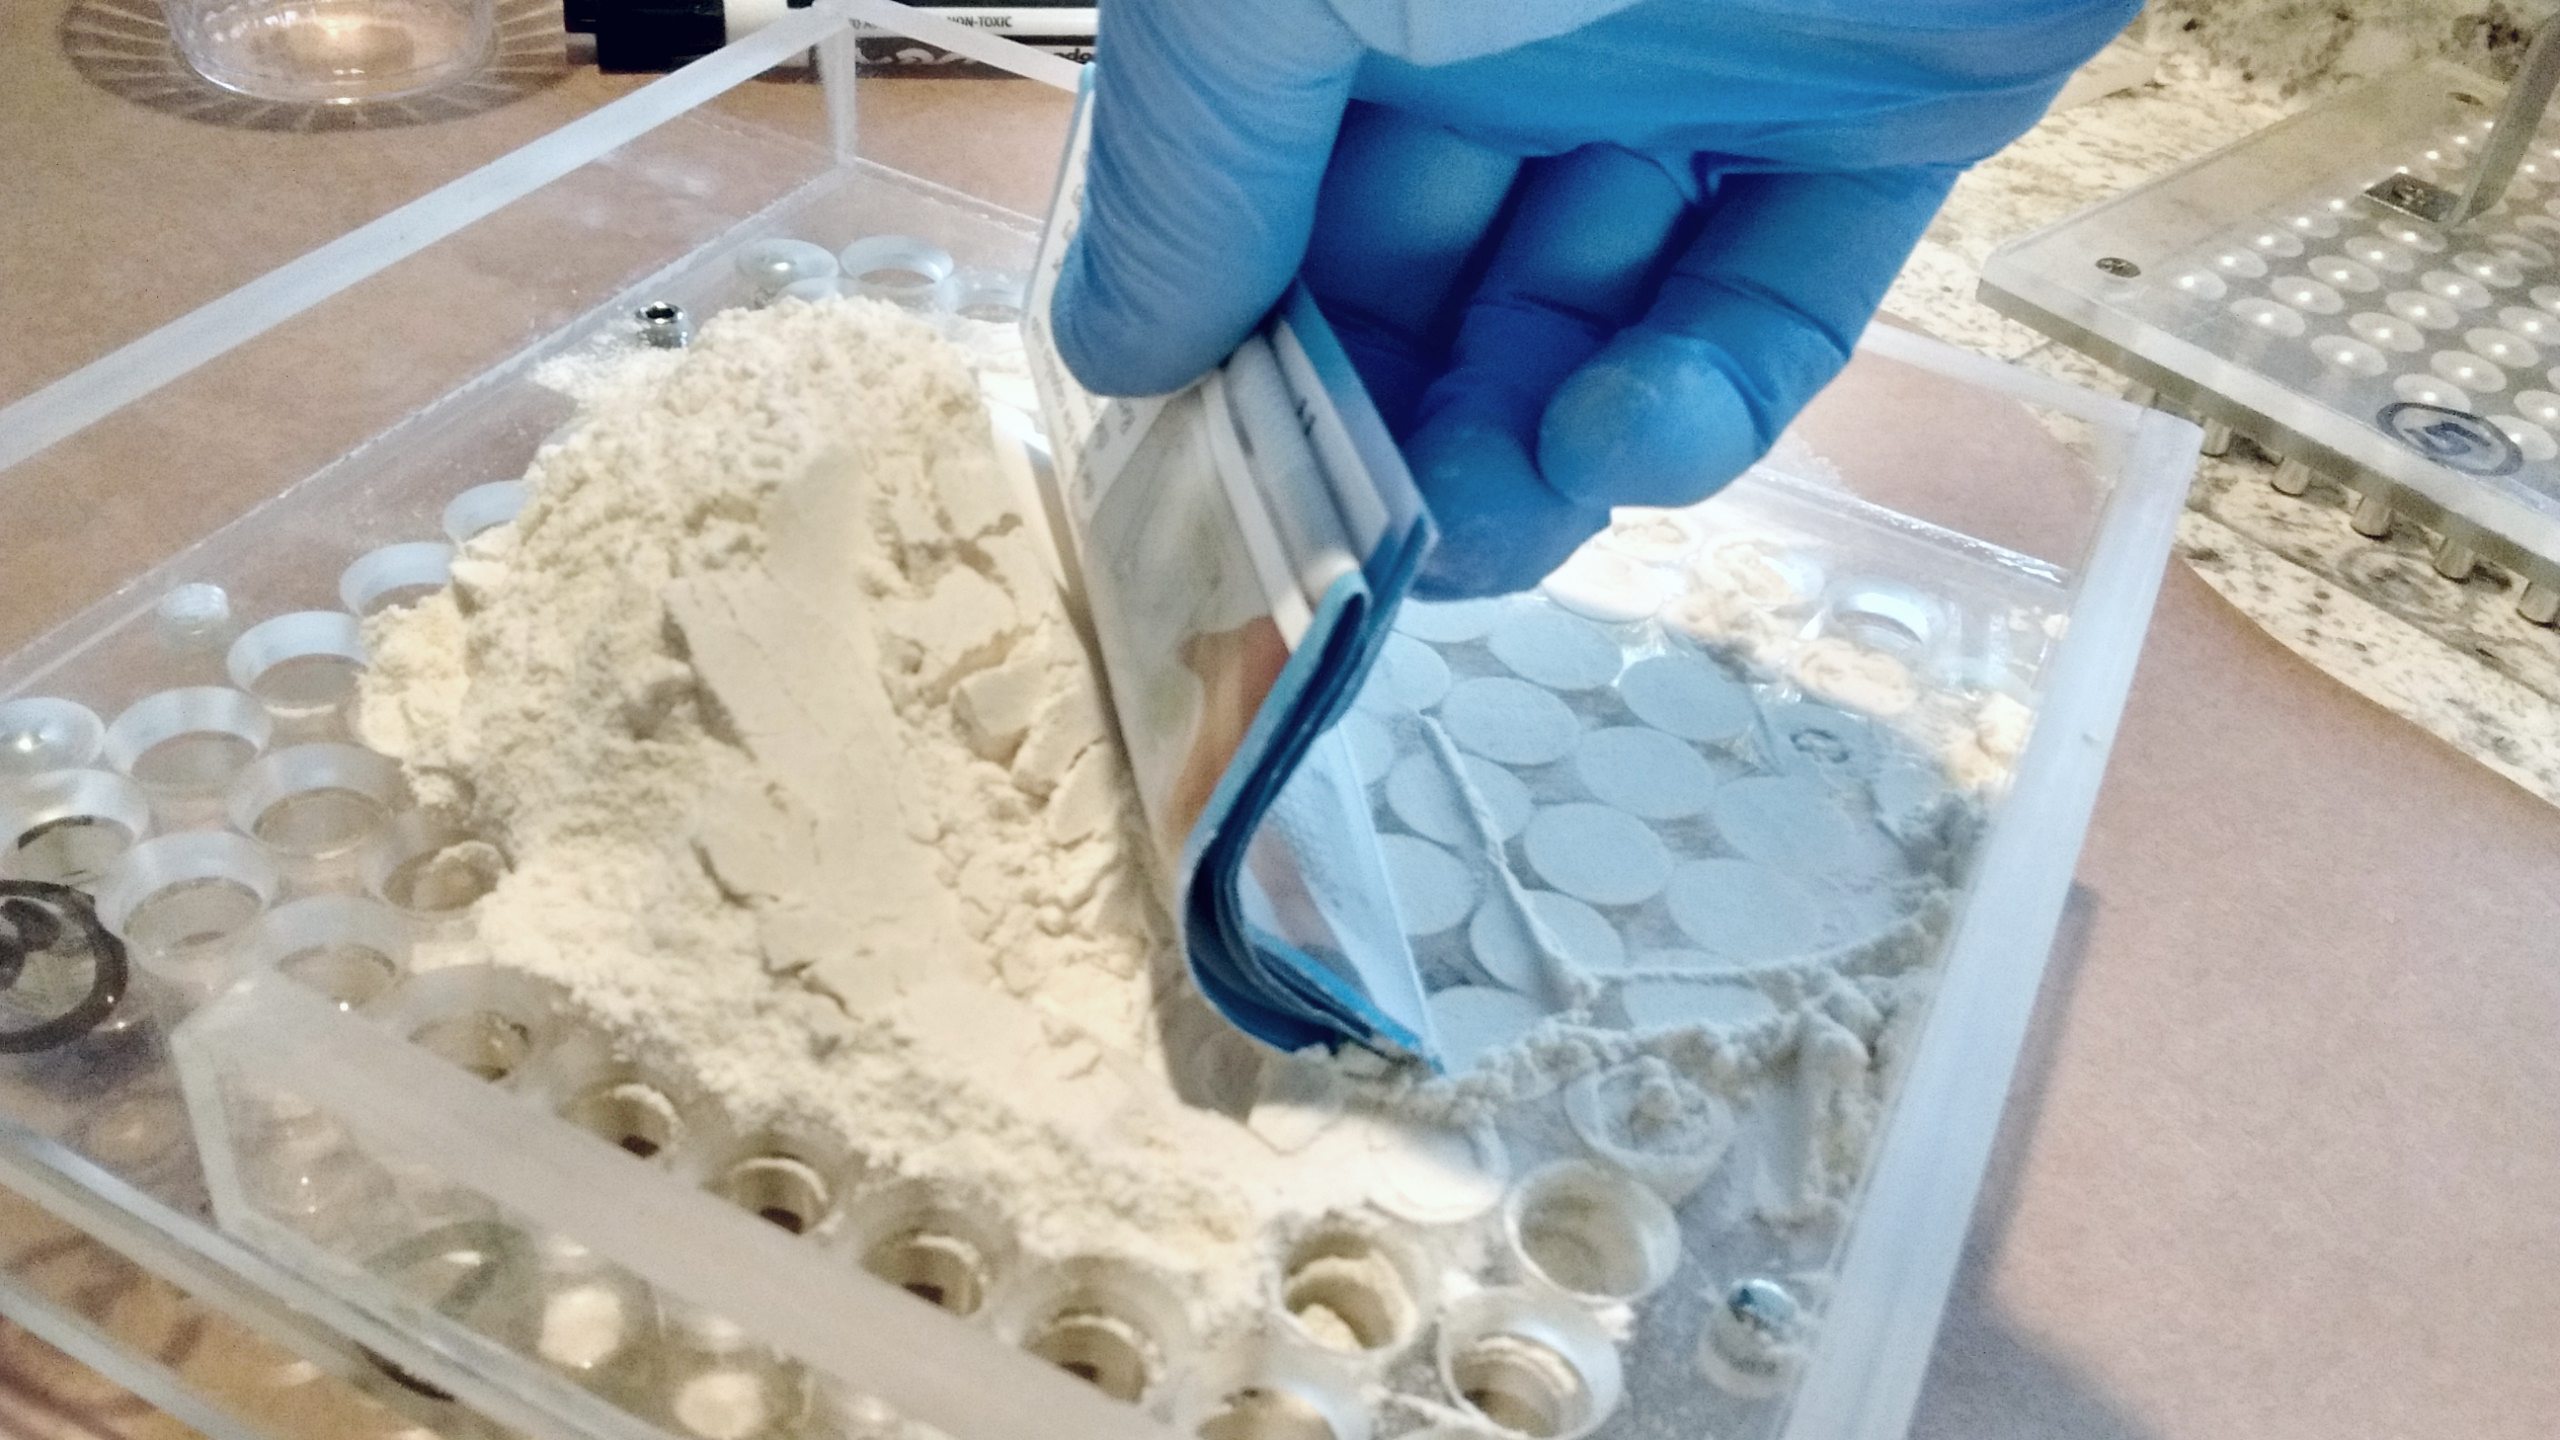
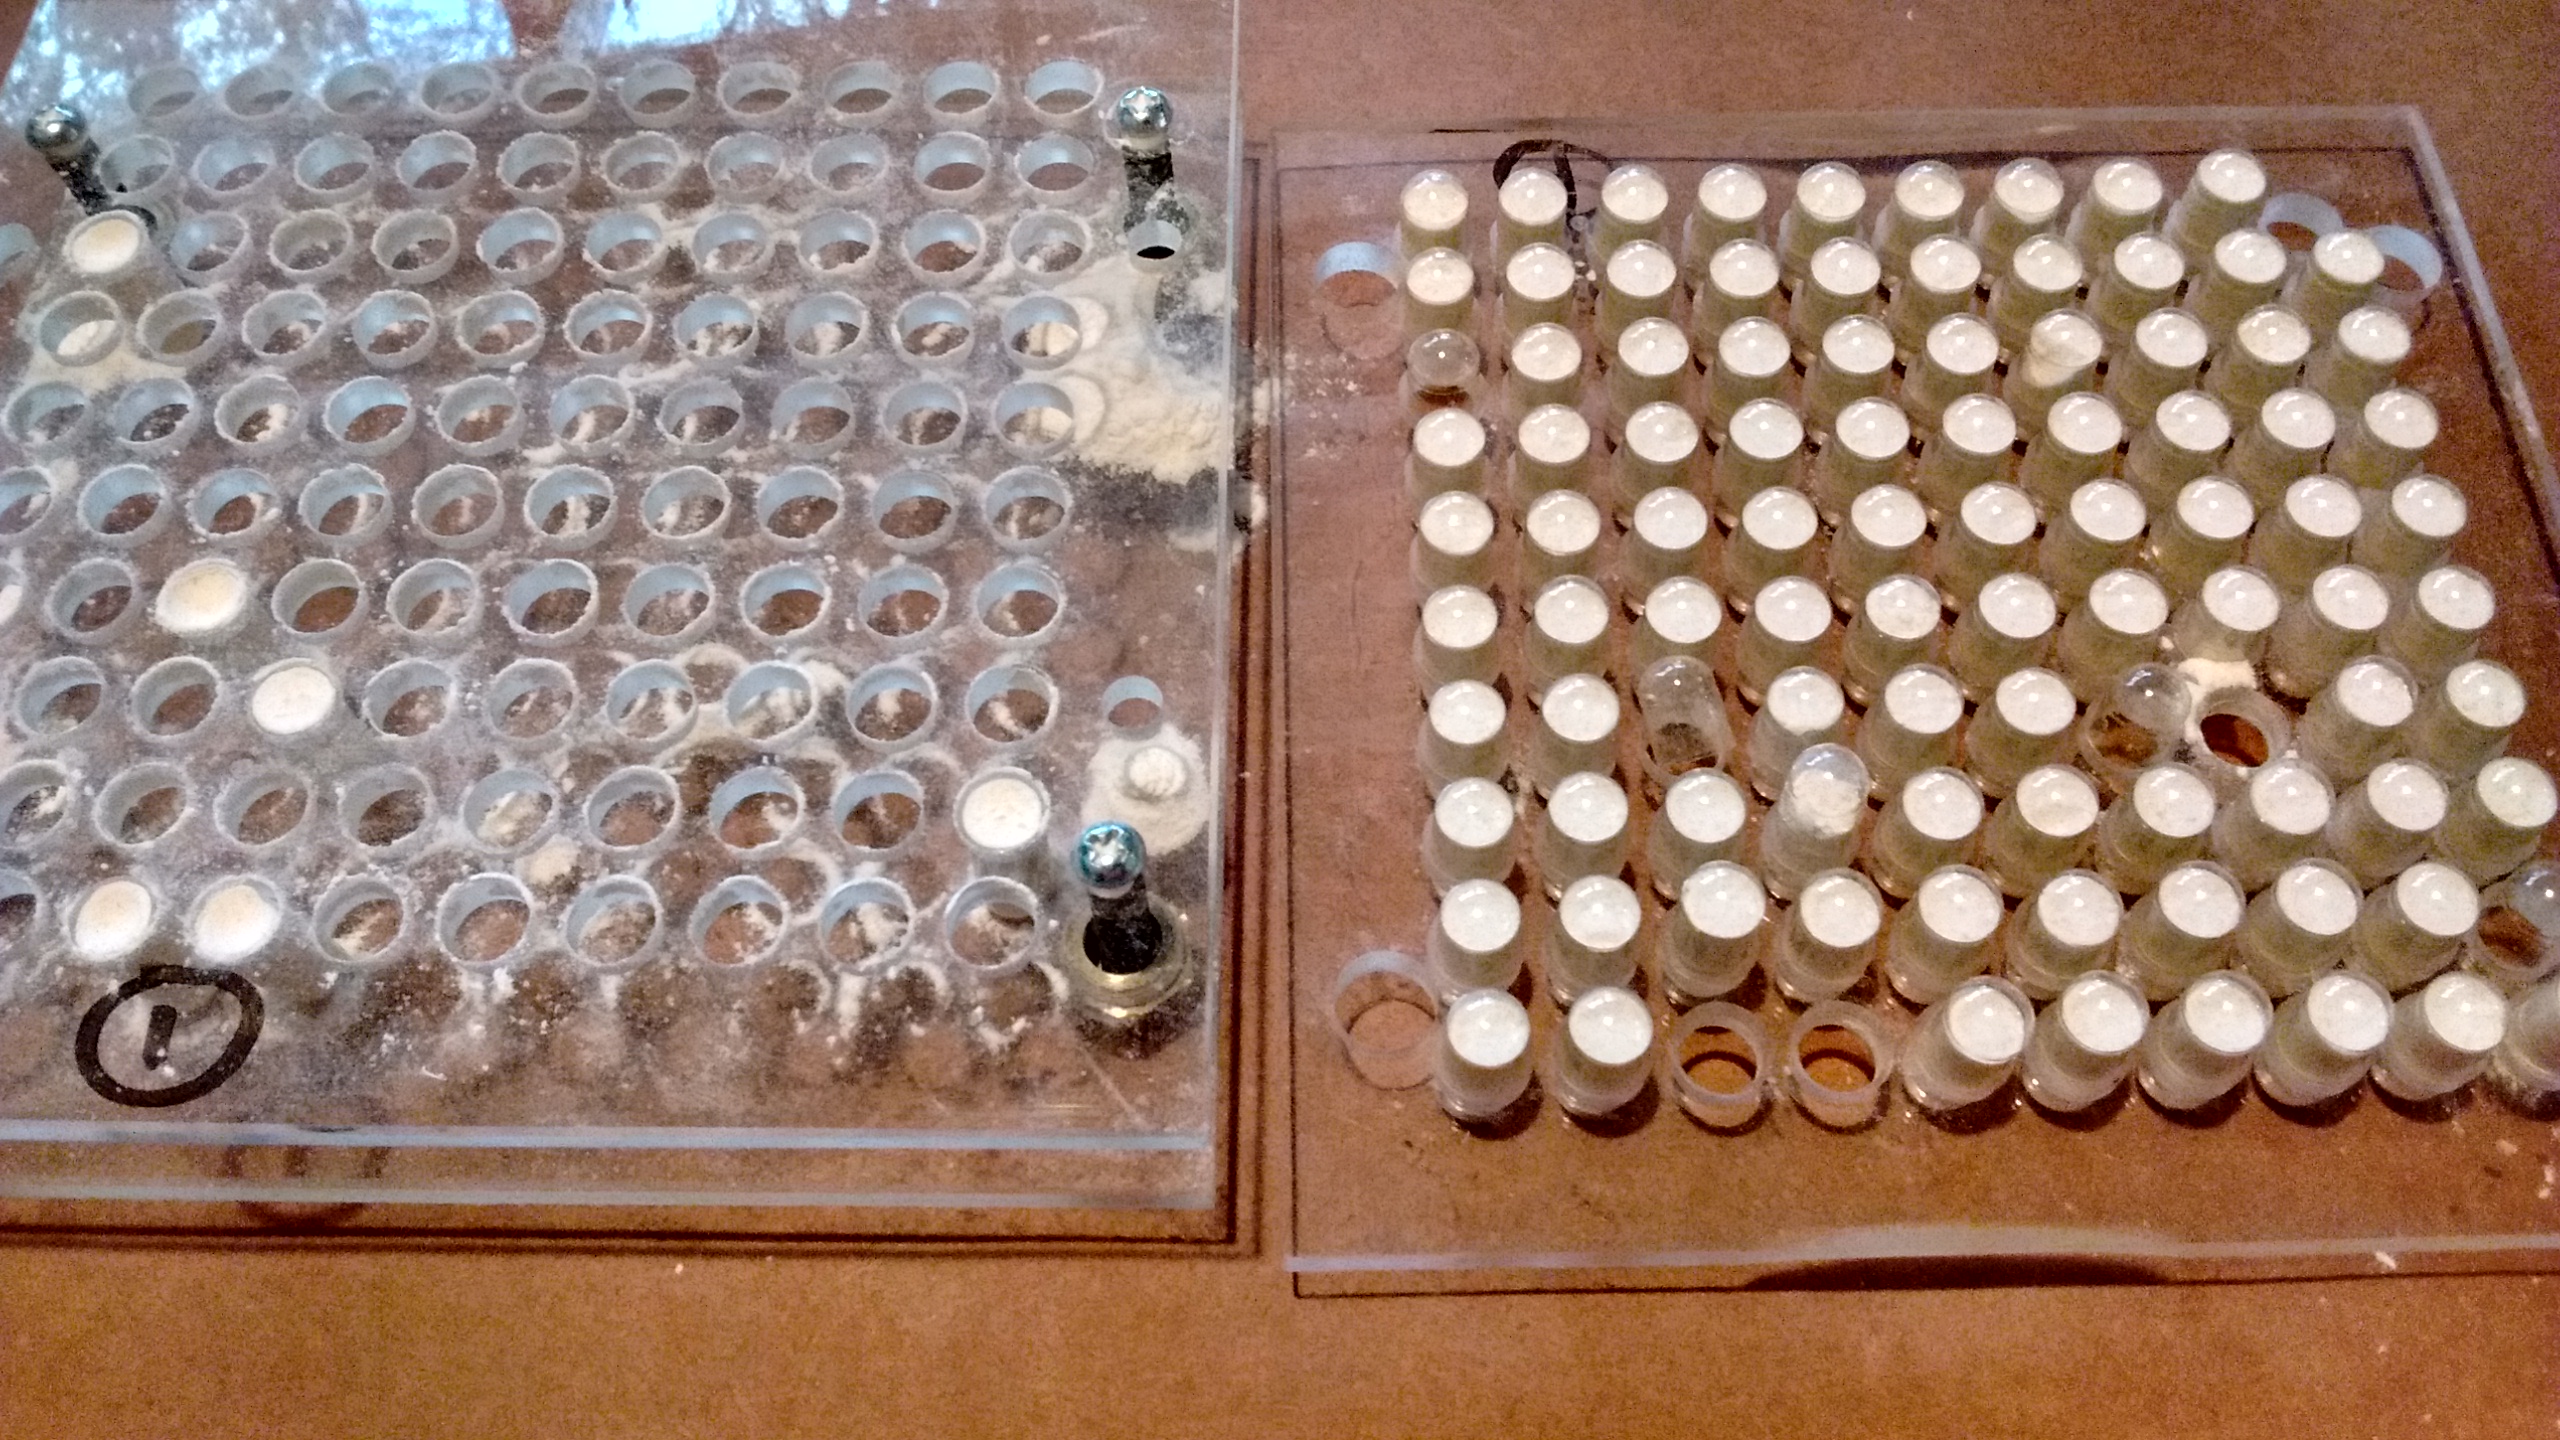
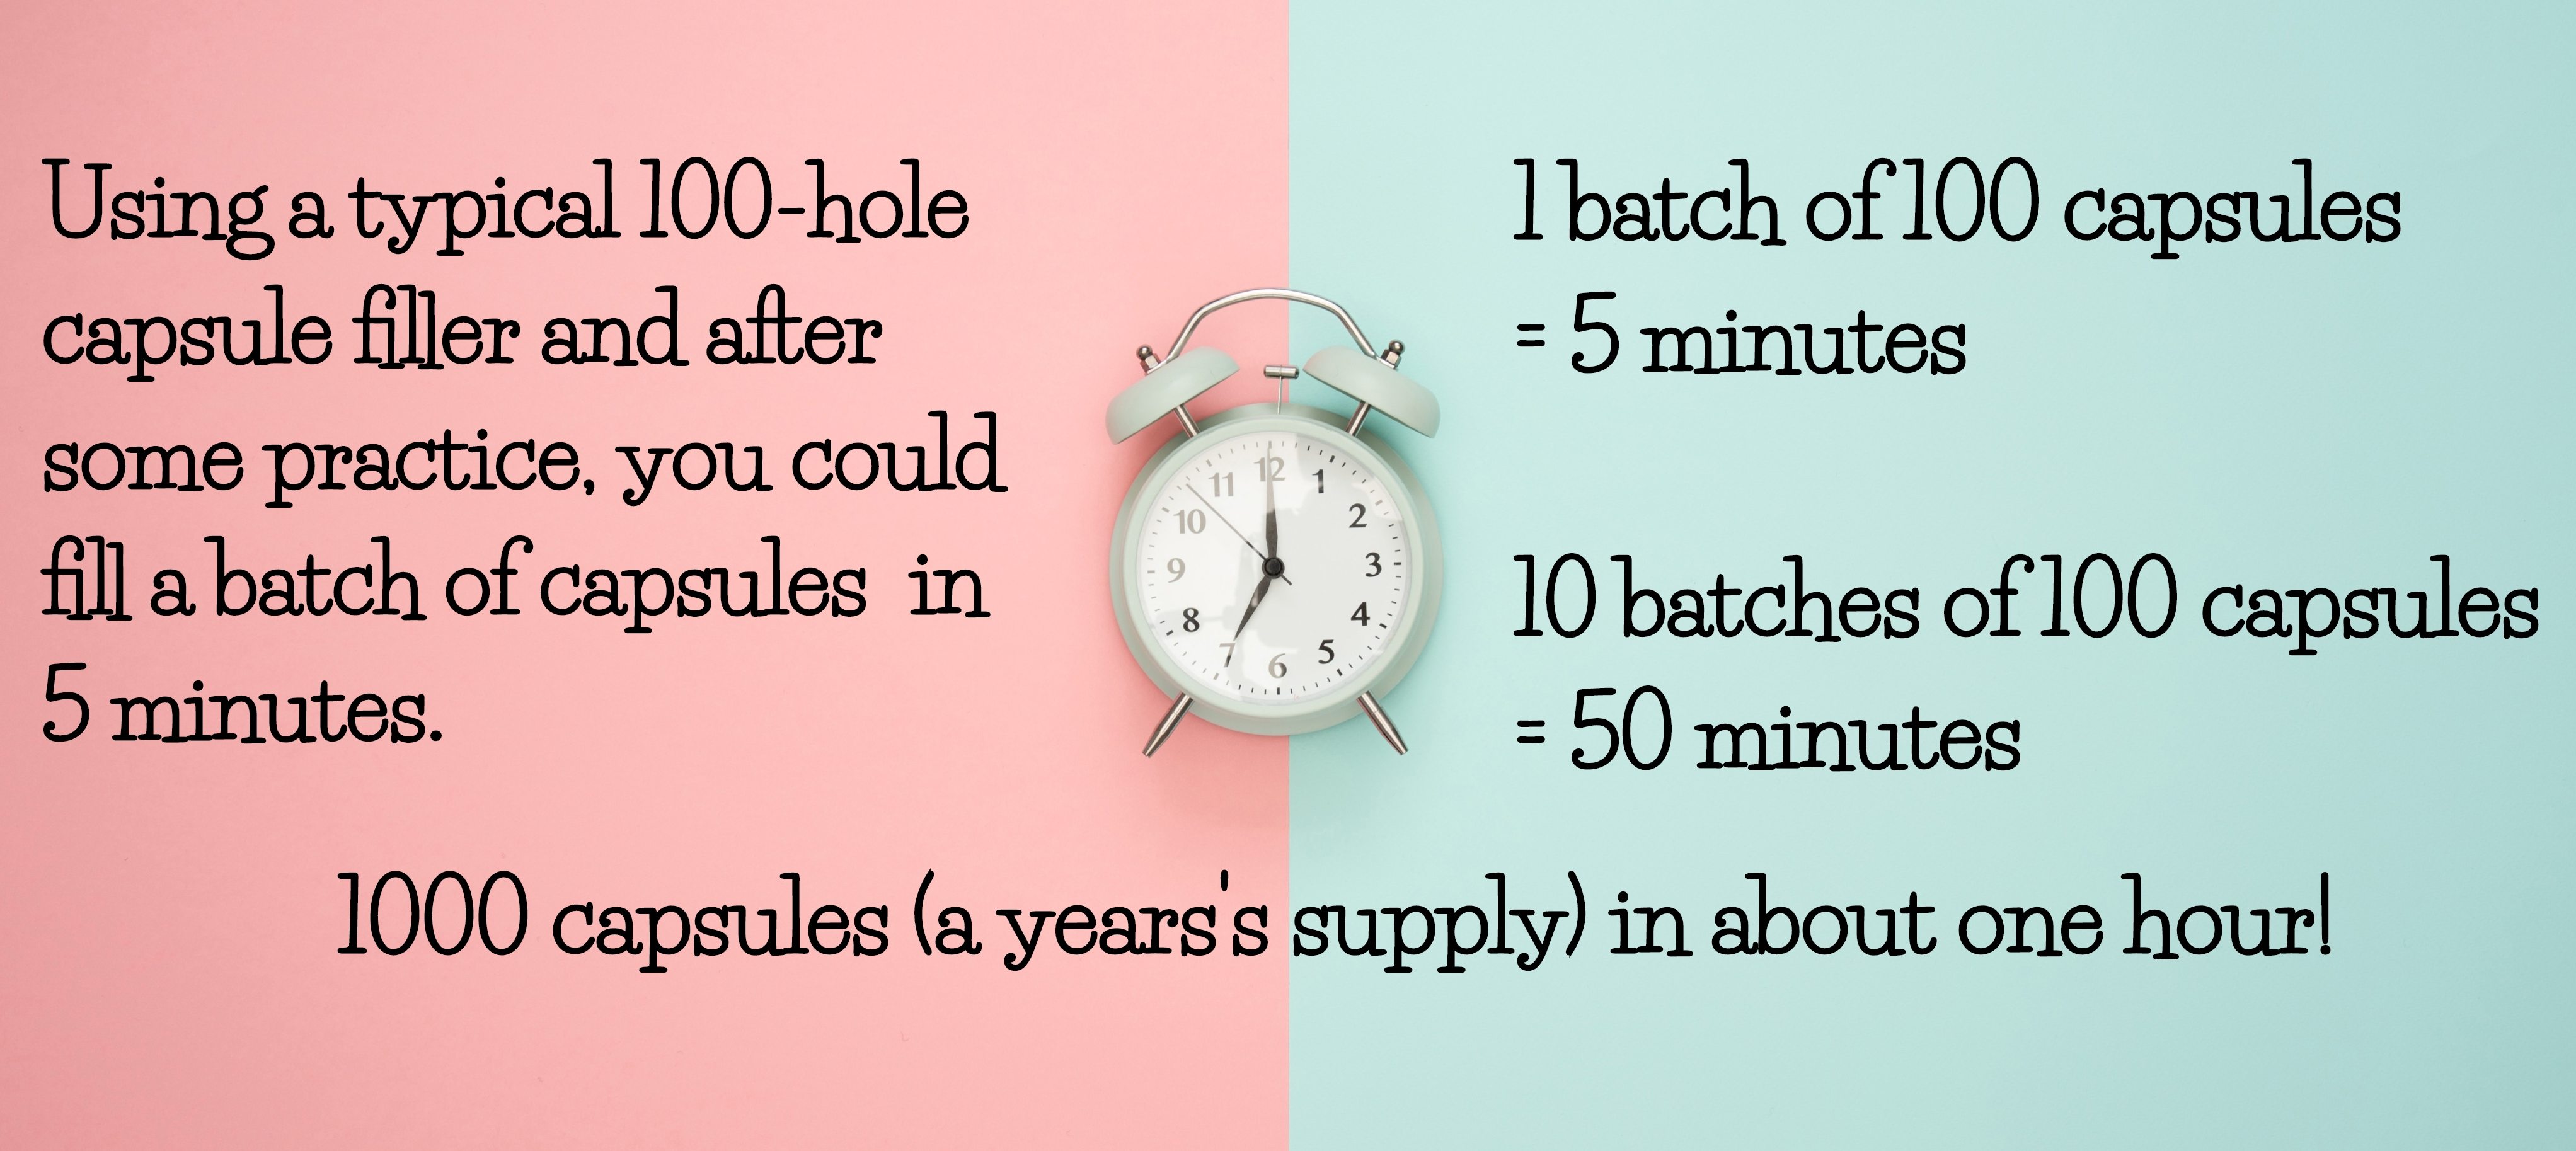
Many of the new generation capsule filling machines operate most efficiently with already separated capsules.  These new machines make it easy to set up your filling station by pouring in the capsule tops and letting them settle into the proper holes.  This goes for the bottom portions of the capsules, as well.  When you’re doing 100 capsules at a time without the separated capsules, you will be required to remove all the tops manually, increasing the time by about 2 minutes per 100 and also increasing your frustration.

With capsule filling machines, such as the Cap M Quik and The Capsule Machine, separated are helpful too, but not as frustrating to use because you’re working with a smaller quantity.  The professional capsule filling machine, The ProFill 100, a wonderful machine by the way, is best used with closed capsules as the machine separates them for you.

Expect to pay a little more for the convenience of separated capsules, about $5 more per 1000.


coming soon:

How about flavored capsules?

Alternative or other options

How about enteric coating or acid resistant coating to delay dissolution.

How many do you need?

Copycat Capsule Recipe – BioSchwartz Turmeric Curcumin with Bioperine 1500mg

Copycat Capsule Recipe – BioSchwartz Turmeric Curcumin with Bioperine 1500mg

Get a year’s supply of BioSchwartz Turmeric Curcumin with Bioperine for only $77.  That’s a 70% savings!

How to Save Big Money on Your Herbal Supplements


Did you know you can easily fill your own capsules?  Yes, you.  Even my mother does it and she’s 81 years old with arthritic fingers.

Filling your own capsules is not only easy, but very cost-efficient.  The first time you do it, it might get a little messy.  The second time, you’ll get the hang of it.  By the third round, you’ll be zipping through the process like a pro.

There are “machines” out there to help you get it done.  They hold all the capsules in place while you spread the powder, then cap them.    There are several types of filling machines you can choose from, each have their benefits and pitfalls. We’ll get into that a bit later.


Why BioSchwartz Turmeric Curcumin with Bioperine?


BioSchwartz (formerly known as Schwartz BioResearch) is one of the top names for quality supplements and it’s no surprise that their Turmeric Curcumin formula is the #1 best seller on Amazon.

If you browse this product’s 10,000+ Amazon reviews, you’ll see that this formula is the best for inflammation, aches & pains, sciatica, autoimmune diseases, and much, much more.  The price isn’t bad either, it’s around $19 a bottle for 90 caps (a month’s supply).  Customers have posted before & after photos of the almost miraculous results they’ve had with this herbal blend.

Same EXACT Formula, Just Cheaper!


I’ll show you how to make the same (or maybe better) formula with this copycat recipe.  All the ingredients and materials are readily available and I’ll guide you through it.  I’ve copied it milligram for milligram and you can easily reproduce this amazing formula.

After this, you might even get inspired to try new formulas and soon realize that you’ll never have to pay high prices for herbal capsules again!


Let’s analyze what’s in BioSchwartz Turmeric Curcumin 1500 mg.


The ingredients are simple, there’s only 3!  They use no fillers and they are packed in size 0 veggie caps.  There’s 90 capsules in a bottle and the recommended dose is 3 capsules per day.  For an average user, that’s a one-month supply.


The bottle label states the ingredients for 3 capsules as:

Turmeric (Curcuma Longa root) 1350 mg
Turmeric Extract 95% Standardized Curcuminoids 150 mg.
Black Pepper Fruit Extract (BioperineR) 10 mg

Divide by 3, and each capsule contains:


Turmeric  450 mg
Turmeric extract 50 mg
Bioperine 3 mg


Next, Gather Your Cost-Saving Ingredients


I was able to find all the ingredients on Amazon for reasonable prices.  You might be able to do better elsewhere.  For the turmeric, the price was for certified organic, so right there, that’s an improvement over BioSchwartz.

I’ve listed enough for a year’s supply or 1000 capsules.  If you feel inspired, you can make them all at one sitting and with the right machine, could take you an hour.  The capsules can be easily stored for that period of time, away from heat and light.


Materials You Will Need

  • 1 lb. of Turmeric (Curcuma Longa root) Powder      $11 on Amazon
  • 2 ounces of Turmeric Extract 95% Standardized Curcuminoids    $25 on Amazon
  • 3 gr of Black Pepper Fruit Extract (Bioperine) (Bioperine is a brand, you can find other Piperine products that are of similar grade and quality)    $30 on Amazon
  • 1000 empty capsules, size O   $11 on Amazon
  • A large bag or container to mix your powders

Total cost to make year’s worth of capsules: $77


I didn’t include the cost of a capsule filling machine because you might already have one.   You can pick one up for around $20.


Not Too Much Time or Effort Needed


Many of the new generation capsule fillers that you can find on Amazon let you fill 100 capsules at a time.  When you’ve gotten comfortable with the machine, you will be able to do a batch 5 minutes.  In an hour you could have all the capsule filling said and done.  A year’s supply!

The more manual filler types, like The Capsule Machine or the Cap M Quik, would take you about 2 hours, but that’s if you wanted to do all 1000 caps in one sitting.

You will also have to set aside a few minutes to blend the powders.  That is best accomplished using a large ziplock bag.  Carefully seal the powders in the bag, leave air the bag when you zip it.  Then carefully roll the bag around until it the powder is blended.  Be sure to hold on to the zipper top while rolling to avoid it accidentally opening.  If you don’t have a big enough bag or container, you could mix it in a bowl, but it will be dusty and it’s probably best done outdoors.


The Savings


This copycat recipe is calculated for 1000 capsules.  A one-year supply of BioSchwartz, 3 caps a day, equals 1095 caps.  I’ve found Amazon’s price of $18.89 a bottle to be very good, with the average price being $23 a bottle on the web.

A year’s supply of BioSchwartz Turmeric Curcumin would cost you ($19 x 12 months) $228.00.  Filling your own caps, $77.  That’s a $151 in savings!

Don’t Be Afraid


First time capsule filling can be messy and daunting, but don’t let that deter you.   You will get comfortable with it in no time.  Watch a YouTube video for guidance, there’s lots of them there.  Good luck & Enjoy!