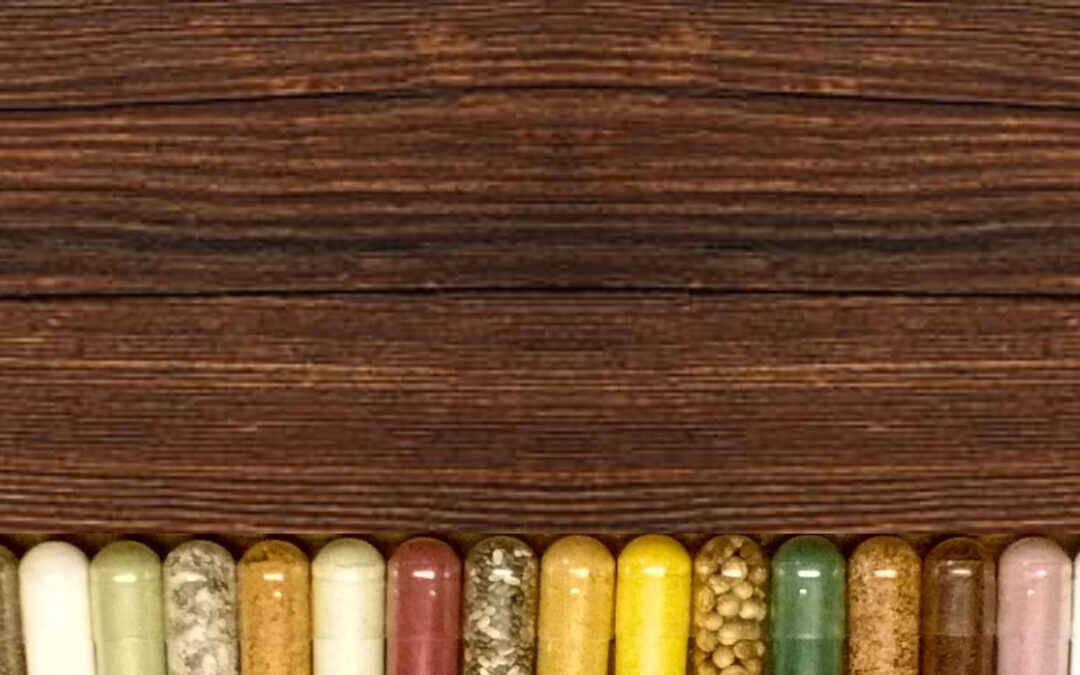
Understanding Fillers: Cellulose, Rice Flour, and Herb Powders
When making your own capsules, choosing the right filler is crucial for ensuring the effectiveness and stability of your supplements. Fillers not only help to fill out the capsule but also aid in the consistent distribution of the active ingredients. In this article, we’ll explore three common fillers: cellulose, rice flour, and herb powders, along with their uses and benefits.
What are Fillers?
Fillers, also known as excipients, are inactive substances used in conjunction with the active ingredients in a capsule. They serve several purposes:
Volume Adjustment: Ensure the capsule is adequately filled.
Stability Enhancement: Improve the shelf life of the supplement.
Ingredient Distribution: Help evenly distribute the active ingredient throughout the capsule.
Cellulose
Cellulose is a natural polymer found in the cell walls of plants. It’s a popular choice for capsule fillers due to its neutral properties and compatibility with various active ingredients.
Uses and Benefits:
Hypoallergenic: Suitable for individuals with allergies or sensitivities.
Vegan-Friendly: An excellent option for those avoiding animal products.
Flow Agent: Helps in the smooth filling of capsules, reducing clumping and ensuring uniformity.
Stability: Provides good stability to the active ingredients, maintaining their effectiveness over time.
Ideal For:
Herbal supplements
Vitamin and mineral capsules
General health supplements
Rice Flour
Rice Flour is a fine powder made from milled rice. It’s another commonly used filler, especially favored for its natural and hypoallergenic properties.
Uses and Benefits:
Allergen-Free: Suitable for individuals with gluten or corn allergies.
Readily Available: Easy to find and affordable, making it a cost-effective option.
Neutral Taste: Does not alter the taste of the supplement.
Nutritional Value: Adds slight nutritional benefits, such as trace amounts of vitamins and minerals.
Ideal For:
Dietary supplements
Herbal remedies
Nutritional supplements for sensitive individuals
Herb Powders
Herb Powders are ground forms of various herbs. They are often used as fillers when the supplement itself is herb-based, enhancing the overall potency of the capsule.
Uses and Benefits:
Synergistic Effects: Complement the active ingredients, providing additional therapeutic benefits.
Natural and Organic: Perfect for those seeking 100% natural supplements.
Versatile: Can be tailored to suit specific health goals by choosing appropriate herb powders.
Ideal For:
Custom herbal blends
Targeted health supplements (e.g., for immunity, digestion, or stress relief)
Traditional herbal remedies
Choosing the Right Filler
The choice of filler depends on several factors, including the type of active ingredient, the desired effect, and any potential allergies or dietary restrictions. Here are some tips to help you decide:
Consider Allergies: Choose hypoallergenic fillers like cellulose or rice flour if there are any allergy concerns.
Match with Active Ingredients: Use herb powders that complement the active ingredients for enhanced benefits.
Check Compatibility: Ensure the filler does not react with the active ingredient, affecting its stability or efficacy.
Evaluate the End Product: Think about the final product’s taste, texture, and appearance when choosing your filler.
Conclusion
Understanding the different fillers available and their uses can help you create effective, high-quality supplements. Whether you choose cellulose for its neutral and stable properties, rice flour for its hypoallergenic nature, or herb powders for their synergistic effects, each filler offers unique benefits. By selecting the right filler, you can ensure that your capsules are not only effective but also tailored to meet your specific health needs.
Happy capsule filling! If you have any questions or need further assistance, feel free to leave a comment or contact us.
We’ve all been there – the struggle of incorporating coconut oil into our daily routine is real. While the health benefits are undeniable, the taste and texture can be off-putting. But fear not, there’s a convenient solution – coconut oil capsules!
By encapsulating this superfood, you can enjoy the benefits without the hassle. Crafting your own coconut oil capsules in not only easy, but also budge-friendly! Get started today with our step-by-step guide and make your ow coconut oil capsules for a healthier you.
Coconut Oil Capsules Materials Needed:
Empty gelatin capsules: Choose the size you need.
Coconut oil: Make sure it is in liquid form. Coconut oil melts at around 76°F (24°C), so if it’s solid, you may need to warm it slightly.
Dropper or syringe: To fill the capsules without making a mess. If you don’t have a steady hand, get small funnels.
Capsule holder or tray: This helps to hold the capsules upright while you fill them.
Steps:
Prepare the Coconut Oil:
If the coconut oil is solid, gently heat it until it becomes liquid. You can do this by placing the jar in warm water or using a microwave. Allow time for the oil to cool a bit, as high temperatures can damage the gelatin capsules.
Set Up the Capsule Holder:
Place the bottom halves of the gelatin capsules in the capsule holder or tray. This will keep them steady and prevent spillage.
Filling the Capsules:
Use a dropper or syringe to draw up the liquid coconut oil.
Carefully fill each capsule with the desired amount of coconut oil. Do not overfill; leave a small gap at the top to allow for sealing.
Sealing the Capsules:
Once filled, place the top halves of the capsules onto the filled bottoms. Press gently but firmly to ensure they are securely closed. If you feel that you’d rather wait to put the lids on until the oil has solidified, put them in the fridge for a few minutes before capping.
Storing the Capsules:
Store the filled capsules in the fridge. or at least a cool, dark place.
Tips:
Work Quickly: Gelatin capsules can start to dissolve if exposed to moisture for too long, so it’s best to work quickly.
Cleanliness: Ensure all equipment is clean and dry to prevent contamination.
Batch Filling: If you need to fill many capsules, consider working in small batches to maintain quality and consistency.
By following these steps, you should be able to efficiently fill gelatin capsules with coconut oil.
Amazon used to be flooded with capsule filling machines. One search could yield hundreds of products available. Past Amazon sales statistics show that over 5000 units a month were being sold!
So what happened? Amazon No Longer Selling Capsule Filling Machines
The D.E.A. happened.
The U.S. Drug Enforcement Agency finally cracked down on capsule filler regulations. For well over ten years, they’ve been requiring small businesses to log and submit sales records of capsule fillers, but they always ignored the big retailers like Walmart or Amazon. This was was a thorn in the side of small retailers, but most complied. When I was selling capsule fillers, I once had three D.E.A. agents show up at my home to make sure I was keeping records. It was quite intimidating, but luckily they were very nice guys.
Keeping these records was definitely an inconvenience for my business. It was time consuming, monotonous, and the worst part was that I felt like I was tattle-tailing on my customers. These people were buying bulk medicinal herbs and empty capsules so that they could save money and control what ingredients were in their supplements. Avoiding such things as fillers and possibly lead-contaminated supplements. This was none of the government’s business. The D.E.A. said that this was because someone could put MDNA or similar drugs in capsules, so the filling machines had to be regulated. Such nonsense if you ask me. If a drug dealer wants to fill capsules, they’re going to find a way.
Anyway, the record keeping process that is necessary to follow the D.E.A. requirements is beyond the scope of what any large retailer is capable of. It takes a personal touch to scan each order, log a serial number of an individual unit, and jot down the buyer’s name, address, phone number, and more. To avoid any legal problems, Amazon no longer allows the sale of these items.
Is there any good news?
Yes, now that there’s no longer a market saturation of cheap Chinese knockoffs, you can simply choose from a few good, time-tested capsule filling machines on the market. They’re available from small businesses who could really use the sales boost.
My absolute favorite capsule filler is the Capsule-It, available from Herb Affair. This is the one that the Chinese knockoffs were trying to copy. You can fill 100 capsules at a time and after a small learning curve, you can make them in about 10 minutes per batch, if you buy pre-separated capsules. That’s the secret to easy capsule filling with this particular unit. Currently, Herb Affair only sells separated capsules in size 00, but you can easily find them on Amazon in the other sizes.
You can rest assure that capsule filling machines are not gone from existence, just gone from the mega, impersonal warehouse retailers. At least now when you buy one, you can feel good that you’re helping small independent business succeed.
Did you know that some popular brand supplements contain added fillers or ingredients from sketchy places? Some are certified clean, but then they can be really expensive. You can easily copy a commercially available supplement by using your own bulk herb powders. Bulk herbs are readily available online in a number of places. You can buy them by the ounce or pound. If you can’t find powder form, try grinding them in a coffee grinder or something similar.
Creating Your Recipe
Whether you’re creating your own blend or copying a brand, it’s helpful to know how many milligrams of each herb are in each capsule. One way to do it is to mix all your herbs together in a ratio that you think works, then when all your capsules are made, just perform some slightly complicated math. It’s difficult to be accurate this way, to say the least.
In an effort to help you calculate your recipe, I developed a ONE-OF-A-KIND calculator that does the math for you! Recipes for milligram-specific, multi-ingredient supplements!
Enter up to 8 Ingredients and even specify each ingredient’s unique density for added accuracy. Choose your capsule size and the amount of capsules you wish to make. Adjust your ingredient ratios and this calculator will do all the figuring for you and tell you exactly how much of each ingredient you’ll need to combine to make the perfect formula for your supplement needs.
Added bonus: Recipes are printable and can be customized with the ingredient names!
Years ago in the bulk herb retail business, I decided to start selling empty capsules. Buy in bulk, count some capsules, package them, and ship ’em out. It would be easy! I would sell in bags of 100 or 500 and I wanted my counting method to be accurate.
I lined up Dixie cups in rows of 10 and would put 10 capsules in each cup. This method works great when you have A LOT of distractions around you. If you can’t go to the count of ten without a child calling your name or a text coming in, then the cup method is a godsend. If you lose count, it’s so easy to count to 10 again for that cup. Imagine you’re up to like 88 and you lose count, how frustrating! After this happens a few times, you’ll never enjoy the process of counting capsules again. Thank you cup method!
But There Was Still Counting Involved, There Had to be a Better Way
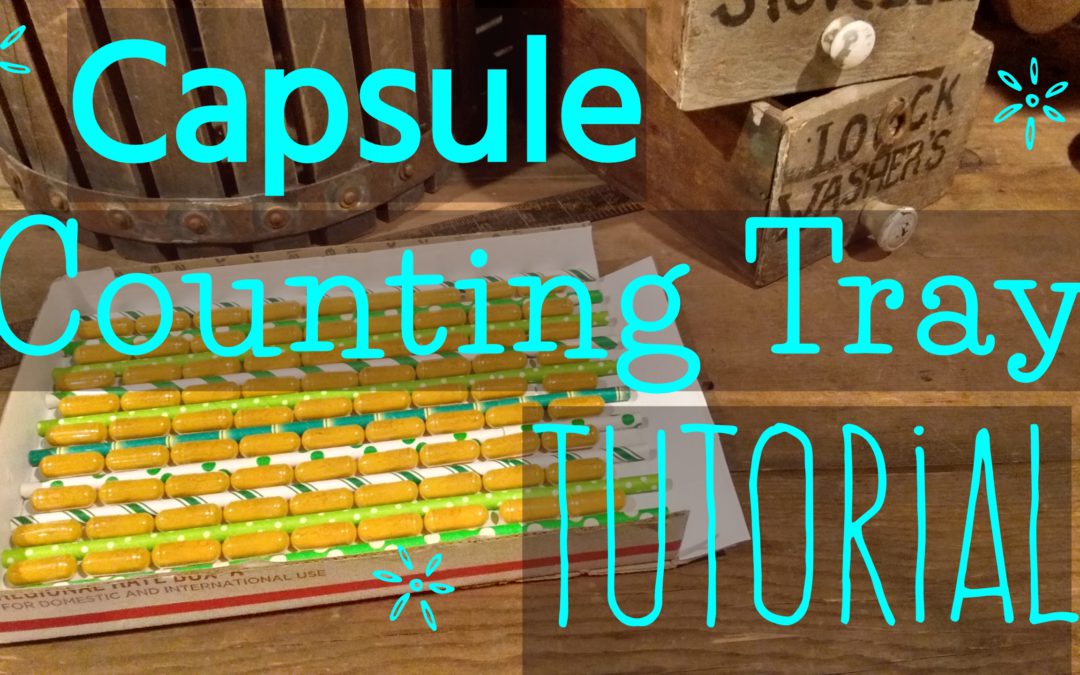
Counting capsules is time consuming. Repeating the process multiple times is even worse! At one point, I even looked into capsule counting machines to try and reduce the monotony. They range from $20 for the paddle type, to thousands of dollars for gigantic stainless steel machines. At that point in my career, spending money was not an option, I had to figure something out that could be accurate and easy to use, so I came up with the drinking straw method. Basically, you glue parallel straws to a tray to use as guardrails, to separate rows of capsules, making counting quick and easy.
When complete, all I had to do was dump a large handful of capsules onto the tray, wiggle it back and forth a little, and slide the unused capsules back into their bag. No more counting, but just a little multiplication. 11 capsules in a row x 9 rows equals 99 capsules in my tray. Then I would pour them into ziplock-type bags with a few extra capsules for good luck and send them out to my customers. Packaged beautifully, of course!
Your tray size will vary depending on the box you use to make it, so I’m not going to tell you how many capsules you’ll be able to count with your counting tray. The bigger the box, the more straws you can fit. The longer the straws, the more capsules you’ll fit in a row. The more rows, yada yada yada, you get the idea.
For longer straws, just butt your straws up against each other, aligning them end-to-end. There’s really no limit to the amounts of capsules you could count by adjusting the width and depth of your tray.
On to the tutorial….
Choosing Your Tray
My very first capsule counting tray was actually made using an upside down, small, lightweight, wooden Ikea drawer, 12″ x 18″. I hot glued the drinking straws down, after some trial and error with capsule width tests. It turned out to work perfectly! I used it for months, then I decided to just sell larger quantities of capsules and switched to different methods entirely.
Cardboard works great and is super easy to work with.
Banker’s box lids are actually perfect. They have a nice lip/edge around them so when you shake your capsules, they stay on the tray. They are usually always smooth on the inside. You NEED a flat surface for this to work, so the capsules can freely glide and slide down the rows to neatly line up for counting and multiplying.
Other Materials You Could Use
If you can’t find a banker’s box lid, the lid from a case of copy paper will work as a quick substitute. The lid from those snap together file boxes works too. Some storage containers in your home might come with a rectangular or square lid with a good edge around it. Often, after you glue your straws down to the lid, you can keep it stored on whatever container it came from when not in use. I love space-saving ideas!
If you’re still struggling for a good tray idea, how about a shirt box and/or its lid? Like the kind that you get around Christmas time from the stores for gift wrapping.
Keep the Sides Narrow, But Not Too Low
If the sides are too high, they interfere with any hand-arranging/fixing you may need to do to the capsules, making it much harder to work inside. If the sides are too low, the capsules will tumble off the sides as you wiggle the tray back and forth to settle them in place.
For Goldilocks to have her box just right, she decided to make it herself:
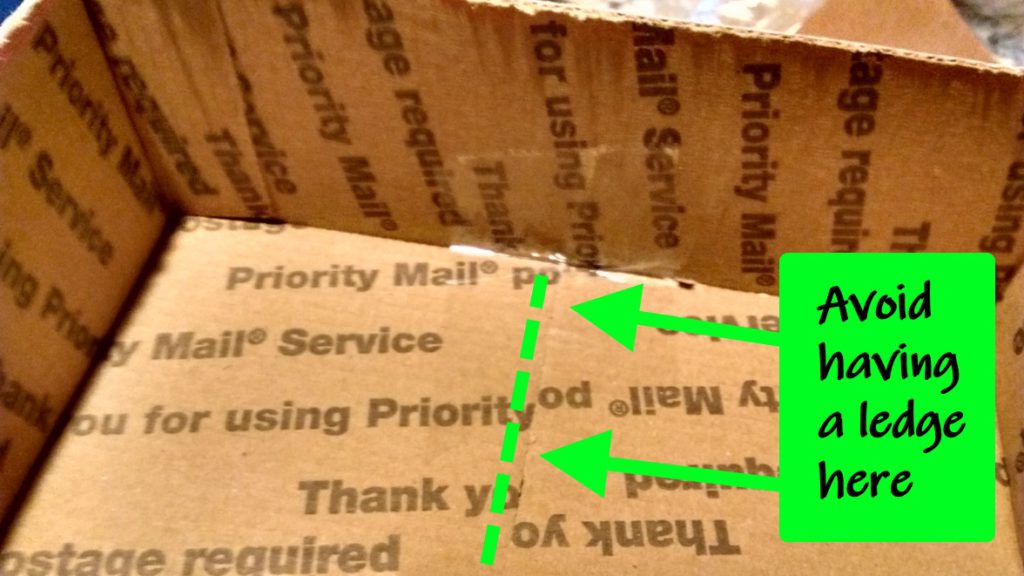
Cutting the box’s height before it is assembled is much easier than cutting down an already assembled box. A height of 2-3 inches should work well.
With this particular box, I was able seal the flaps in the opposite manner in which they’re supposed to go. This created a flat working surface inside the box. With an already assembled box, you may need to cut the tape, open the flaps and reset them for a smooth working surface.
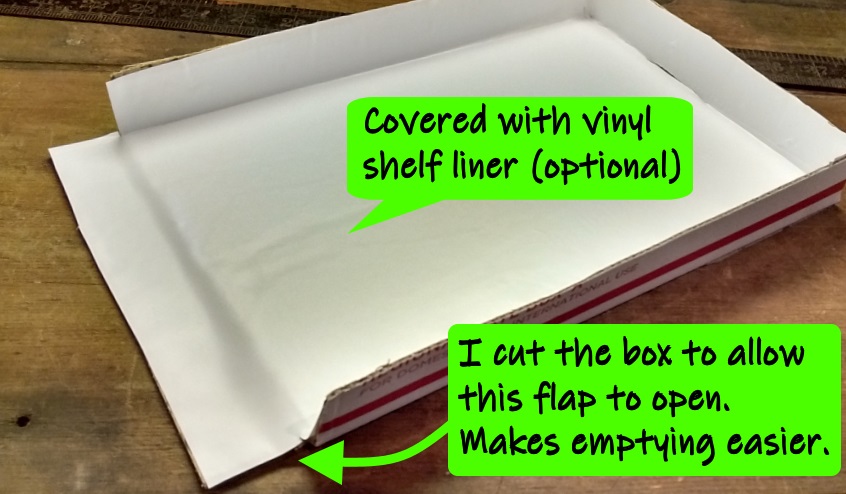
To keep the surface smooth, you could glue down some paper, use aluminum foil, or place contact paper over the surface. This part is totally optional, but it does help with smoothing an uneven surface.
I also opened up one edge of the box to allow the unused capsules an easy way out and to help when releasing the counted capsules.
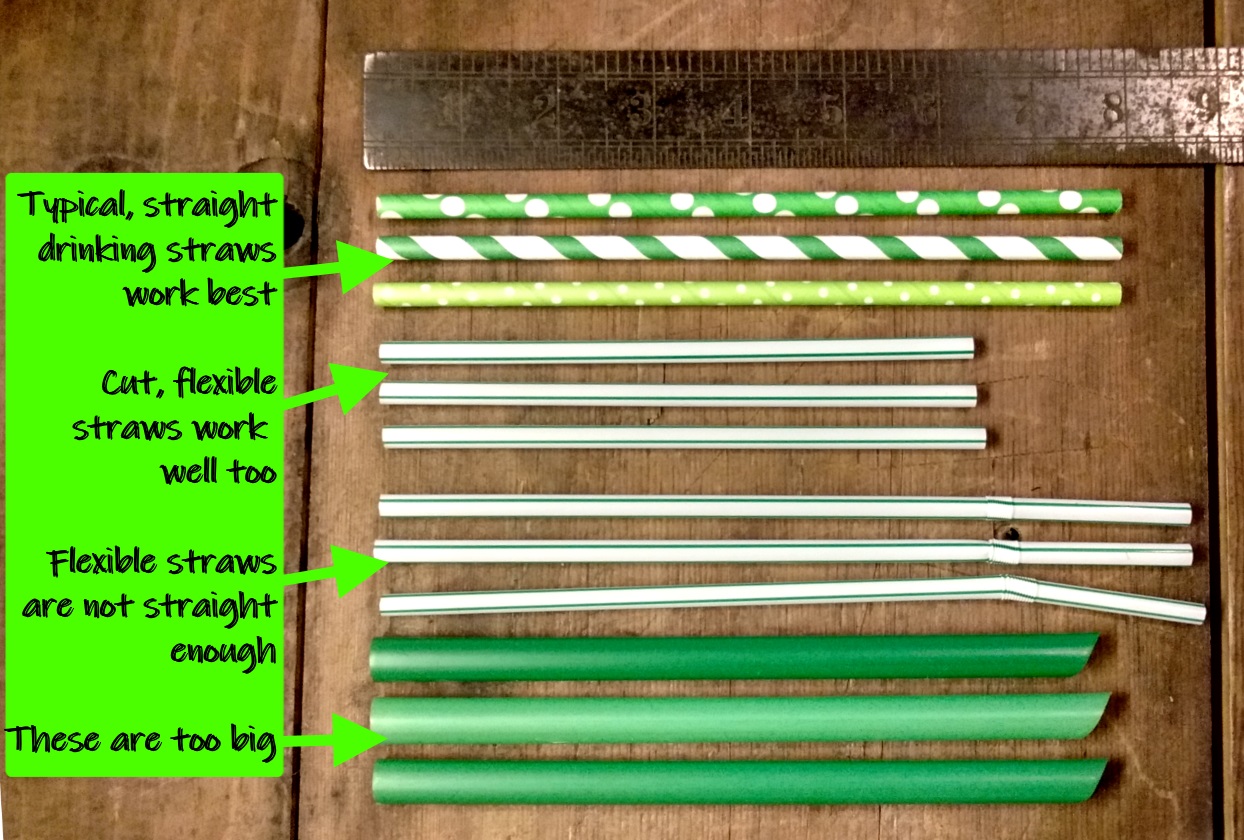
Selecting the Drinking Straws
Most straws come in lengths between 7 and 9 inches and they come in varying widths. I’ve tried the wider straws and they do not work as well. The more thin or narrow the straw, the better it will work for lining up your capsules.
Flexible straws will not work well in this application either because consistently straight lines are necessary, but if that’s all you have, they can be easily modified to work. Cut them just below the flexible part, a straight cut is best. Discard the flexible part or find something fun to do with them. If your straws are now too short, take another straw (or piece) and butt it up against the first one. That is why a straight cut is nice.
Either paper or plastic straws will work fine for this project, but be sure to choose a complimentary adhesive for the two surfaces.
Speaking of Adhesive
Glue guns are one of my favorite inventions. I choose mine over household glue 9 times out of 10, so whenever I have a glue-able moment, a glue gun is my go-to item. That being said, it’s not so great with this project UNLESS you are really good at being precise and not messing up, like at all. Because hot glue, now cold, does not clean up easily, especially in a small space, such as between delicately-placed straws.
Your straws need close-to-exact parallel alignment. You want your capsules to be able to slide easily up and down the channels between the rows. This makes the lineup and release go smoothly. If there are any hot glue remnants in the channels, the capsules will get hung up and mess up the process. If you’re going this route regardless, hold your straws vertically, instead of the natural instinct of horizontal, when applying the glue. This way when the glue runs a little, it will run along the bottom of the straw and not encroach up the sides of the straw, which would again, impede the sliding capsules.
Also, if using a glue gun, a contact paper surface will clean up better than a cardboard surface, making it a little easier to work with.
Alternately, you could place the straws onto a very thin line of hot glue. That would make for a very clean process. The caveat is you need to pre-plan your line placement and draw them in place. I will not go into the logistics of that here because it varies for different size straws and capsule sizes and it’s kind of a pain in the neck. If you don’t mind doing that kind of thing, your capsule counter is going to be nicer and more well made than mine.
Slower Than Hot Glue, but Easier to Work With
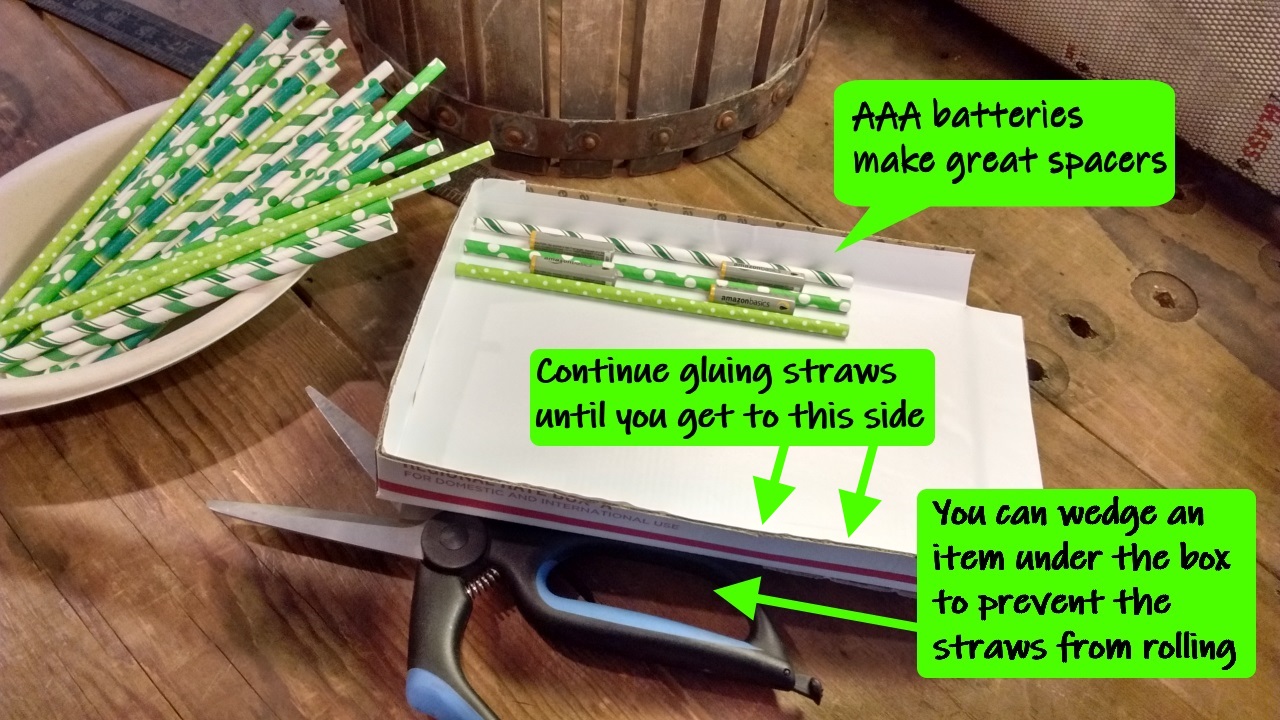
A tacky glue can work perfectly in this project. It’s like an Elmer’s white glue, but thicker and dries a bit faster. If you have a favorite glue you like to work with, then have at it. It doesn’t really matter except faster setting is advantageous. Also, if using a white glue, you will need more spacers to keep the straws from rolling back before they’re the glue’s completely set.
Now Begin
Start by gluing your first straw against one side of the tray. Use AAA batteries to space your straws and continue gluing.
The AAA battery worked well for me as a spacing guide. The space it left worked well for the largest size, 000, down to the small size 1.
Continue gluing straws until you get to the other side of the box. If you have a small opening left, cover it with a straw so capsules don’t get wedged in it.
To Make Your Rows Longer
It’s so easy to cut and glue a few more pieces of straw and line them up end to end.
It should look something like this when you’re done…
By the way, if you’re wondering about the straws I used, I found them on Amazon. They are paper straws, but are extremely stiff and super-easy to work with. I couldn’t resist the fun assortment of patterns!
To Use Your Capsule Counting Tray
Simply dump a small pile of capsules onto the tray, like so..
Wiggle the unit from side to side so capsules can jump the straws to find a vacant spot.
Continue to gently shuffle it until they fall into place. Push off the excess capsules.
When you’re done, capsules slide out easily because of the flap.
This tray that I made will fit 90 size 000 capsules, a 90-day supply. It was loaded, shaken, and cleared in well under a minute without any counting! A great time saver for a monotonous job.